

How to Record a Voice Memo on Your iPhone

Updated: Jan. 25, 2024
Take note: Your iPhone's Voice Memos app can help you record pretty much anything.
You can’t help when inspiration strikes, and often that happens when jotting down a note is inconvenient. Maybe you’re walking the dog, no paper on hand. Or maybe you’re driving and can’t (and shouldn’t) take your eyes off the road. The easy solution: Record a voice memo.
The iPhone’s Voice Memos app is also incredibly useful for recording conversations (be sure to ask permission first!). Let’s say your doctor is explaining a diagnosis or your pharmacist is giving you tips on taking your medication. By recording a voice memo, you don’t have to divide your attention between the conversation and note-taking. The voice memo app is also useful for remembering what to pick up at the market, recording notes in the classroom, and easily creating a backup or replacement for your notes.
Keep reading for step-by-step instructions for recording a voice memo. Then learn how to record a phone call on your iPhone, access hidden iPhone features and voice memo features, screen record on an iPhone, and use a whole bunch of cool iPhone hacks.
How to record a voice memo
Ready to record your voice memo? It’s really easy. Keep in mind: You can record a voice memo while on the phone.
- Locate the Voice Memos app on your phone. (Can’t find it? Swipe down from the center of your screen and type Voice Memos in the search bar.) If you use it frequently, organize the apps on your iPhone so Voice Memos is on the home screen or in the dock.
- Press the big red dot.
- You’ll hear a beep, which means the recording has begun.
That’s it! We did say it was super easy. Of course, it’s a good idea to test the sound level and do a couple trial runs before recording anything important. You may need to move the microphone closer or farther away.
As you record, you may notice a few things happening:
Your recording gets a name
Your iPhone will give your voice memo a temporary name. The one I’m recording right now has the catchy name “New Recording 8.”
The timer begins
The timer will start, giving you an idea of how long your voice memo has been going. You can keep recording for a while (Apple doesn’t specify a time limit), but just how long of a voice memo you can record depends on how much storage space is on your iPhone.
The volume is monitored
You’ll see a series of red vertical lines at the bottom of your screen (above the red dot), which give you an idea of the volume of your recording. The softer you speak, the shorter the lines will be.
An orange dot appears
You may notice an orange dot in the top right corner of your screen, just above the bars that indicate cellular service. This lets you know the microphone is being used.
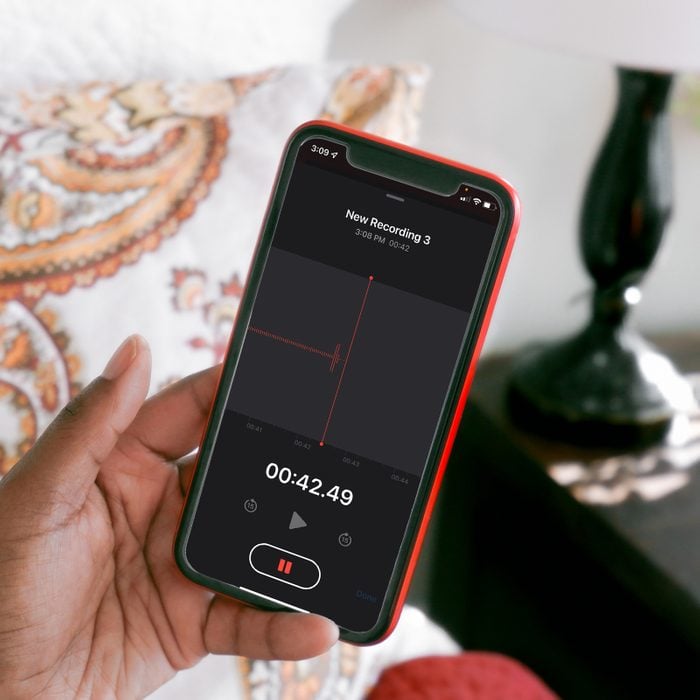
How to pause a voice memo
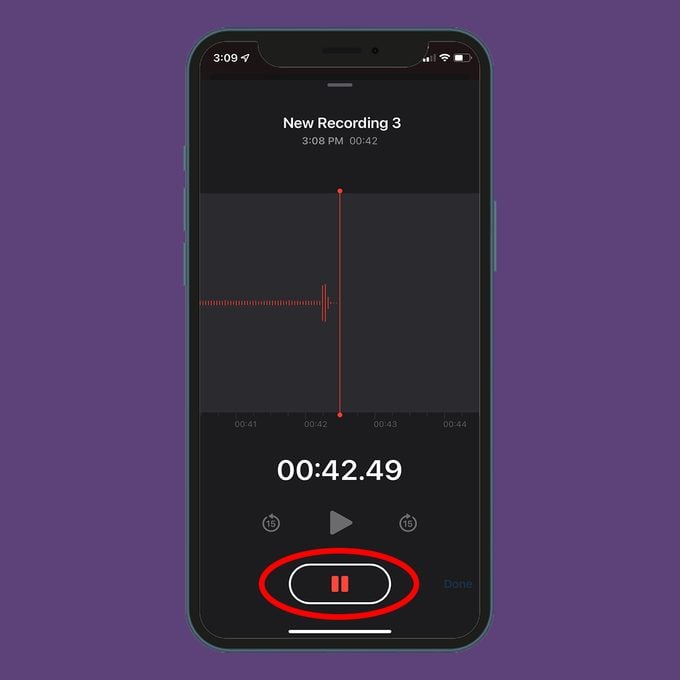
There are many reasons you may need to pause your recording. Maybe you’re only trying to record one speaker. Maybe the person you’re talking to had a coughing fit in the middle. Or maybe the meeting you’re recording had a brief break. Whatever the reason, you can hit pause in the middle of recording a voice memo.
- Expand your recording screen by swiping up from the bottom of the screen. You can also try this iPhone trick: Tap anywhere in the recording box (avoid hitting the red square, which stops the recording) to expand the screen.
- Tap the pause button. It looks like an 11, or the universal symbol for Pause.
- When you’re ready to start recording again, tap Resume, and you’re good to go!
Do yourself a favor and test this function before taking an important voice memo. You don’t want to forget to hit resume!
How to stop a voice memo
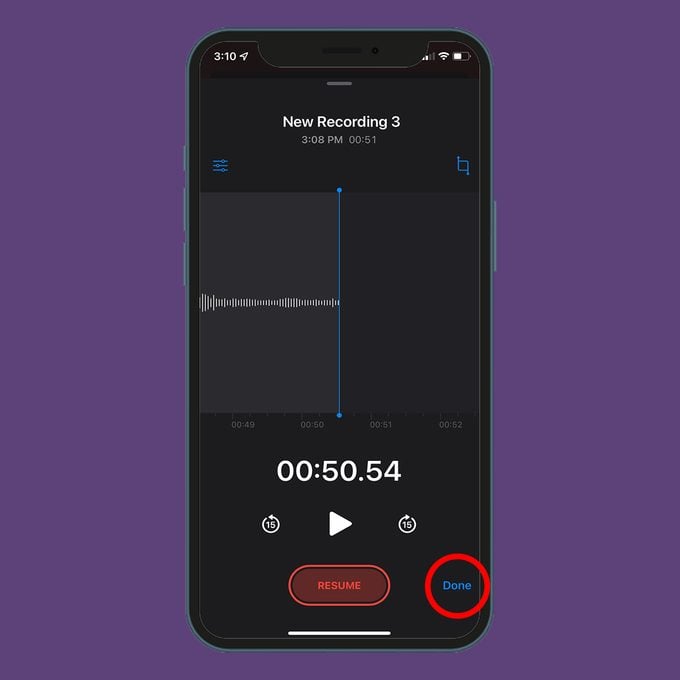
Have everything you need? Great! Time to stop recording.
- If you’re recording on the main screen—the recording will appear at the bottom of the screen—tap the stop button. It’s a red square inside a circle.
- If you’re recording on the expanded, full-size screen, click the pause button and then hit Done (in the bottom right corner).
Your recording will probably be saved with the very uninspired name of New Recording. If your iPhone’s location services are turned on, your voice memo might be saved with the name of your location.
How to save a voice memo
Voice recordings are automatically saved to your iPhone’s Voice Memos app. You can find a list of them in the app’s All Recordings list, but you can also save them to specific files.
Before you do, you’ll probably want to change the name of your file so it’s more memorable. To do that, simply tap the name of the recording and type in a new one. From there, you can save it to a folder, share it via email or AirDrop, or save it to a folder on iCloud. Read on to find out how.
Save to a Voice Memos folder
- Tap the recording you want to move.
- To the right of the name, you’ll see a circle with three dots in it. Tap it.
- Select Move to Folder from the list below.
- Tap on the folder you want your recording to appear in.
- To create a new folder, tap the folder icon in the lower right-hand corner. Give the folder a name, then hit Save. Select that folder to save your recording there.
Share via email or AirDrop
- Tap the recording you want to move.
- To the right of the name, you’ll see a circle with three dots in it. Tap it.
- Click Share from the list below.
- Select how you’d like to share the message. You can tap the Mail icon to send it as an email attachment. Or use AirDrop to send to another Apple computer, phone, or tablet.
Save to an iCloud folder
- Tap the recording you want to move.
- To the right of the name, you’ll see a circle with three dots in it. Tap it.
- Select Save to Files from the list below.
- Tap the folder you’d like to add it to.
- To create a new iCloud folder, tap the folder icon in the top right corner.
This would be a good time to make sure all your files—including videos, photos, and voice memos—are automatically being backed up to iCloud. To check, go to Settings and click your name at the top of the page. From there, click iCloud and make sure iCloud Backup is on.
You can toggle it on (or off) for various apps in the list. With iCloud backups on, your new voice memos will automatically be available on all of your devices, provided you’re signed in with the same Apple ID.
Handy, right? It’s also useful to know how to lock apps or hide apps on an iPhone.
How to delete a voice memo
Don’t need your voice memo anymore or want to clear up some space? Here’s how to delete your unwanted voice memo on iPhone.
- Go to your list of recordings.
- Select the recording you want to delete.
- Tap the trash can icon, and you’re done!
Have a whole bunch of recordings you want to get rid of? Consider this your guide to a mass voice memo cleanse:
- Go to your list of recordings.
- Tap Edit (in the top right corner of your screen). Circles will appear to the left of all your recordings.
- Select each voice memo you want to delete. As you do, the circle will turn blue, and a check mark will appear in the center.
- Tap the trash can icon in the bottom right-hand corner of your screen. Whoosh! All the voice memos you selected have been deleted.
Keep learning more about your smartphone by reading up on how to screen record on an iPhone.
Source:
- Apple: “Make a recording in Voice Memos on iPhone”

Originally Published: March 28, 2022