

9 Exercises That Can Banish Your Back Fat
Updated: Feb. 01, 2023
As if finding the perfect bra wasn’t hard enough, women also have to deal with the nuisance of “bra bulge”—that back fat that creeps up underneath your arms and around the straps of your bras and tanks. Targeting these areas isn’t easy, but it’s also not impossible. Here’s how.

Bent-over dumbbell rows
Adam Rosante, a certified CFT and fitness nutrition specialist, recommends this exercise to target those middle to back muscles and lats (latissimus dorsi). “A large majority of individuals have a weak upper back, which contributes greatly to poor posture and shoulder injuries,” Rosante says. “These moves strengthen those muscles, helping to pull the body into alignment.” Standing with your feet hip-width apart, grab a dumbbell in each hand and hold at your sides. Maintain the natural arch in your spine as you press your hips back and lower your torso until it’s almost parallel to the floor, allowing the dumbbells to hang straight down with wrists positioned under the shoulders. Pull your shoulders back and row the weights to your hips. Hold for one second and lower with control back to your starting position. That’s one rep, Rosante says. Do 12 to complete your set. These easy tricks can perfect your posture.

Chaturanga push-up variation
When we talk about targeting back fat, we’re also looking at our pectoral muscles. Lindsey Warner, a certified yoga instructor, recommends a classic yoga move that works many parts of the body: the chaturanga. Although probably the most common and most effective move used in power and vinyasa yoga classes, the chaturanga is often done incorrectly. “The first thing to remember is that they are difficult,” says Warner. “I would recommend for all people that are brand new to start on their knees, for sure… If your legs are really, really long, it’s just going to be better and safer in your upper body.” To begin a chaturanga, come to a high-plank position, spreading your fingers wide and stacking your wrists right underneath your shoulders. Externally rotate your arms so that the insides of your elbows face straight forward. Begin to bend your elbows and lower down, even if it’s just an inch or two. Your elbows should move straight back along your ribcage (although you should be careful not to hug in too much into the trunk of your body). The shoulder blades shouldn’t pinch and there shouldn’t be a large dip between them; keep your neck in line with your spine. Press back up and into child’s pose. Do these movements back and forth.
Psst! You might be interested to know that science has revealed wearing sauna suits helps you burn more calories.

Scapula twists
Nicole Winhoffer, a celebrity personal trainer, likes to begin each of her classes with back fat-fighting arm exercises in order to trigger and warm-up those muscles. With your elbows bent at 90-degrees, bring your arms to a goalpost position, lining up with your shoulders. Maintaining goalpost arms, begin to move the arms towards each other, covering your face. Then open the arms back out to the side and flick your wrists back. “It’s a rotational movement, thinking about circular motion,” Winhoffer says. “It’s an exaggerated movement.” Do about 30 of these to complete your set. (Make sure to stay away from these common exercises that work against you.)
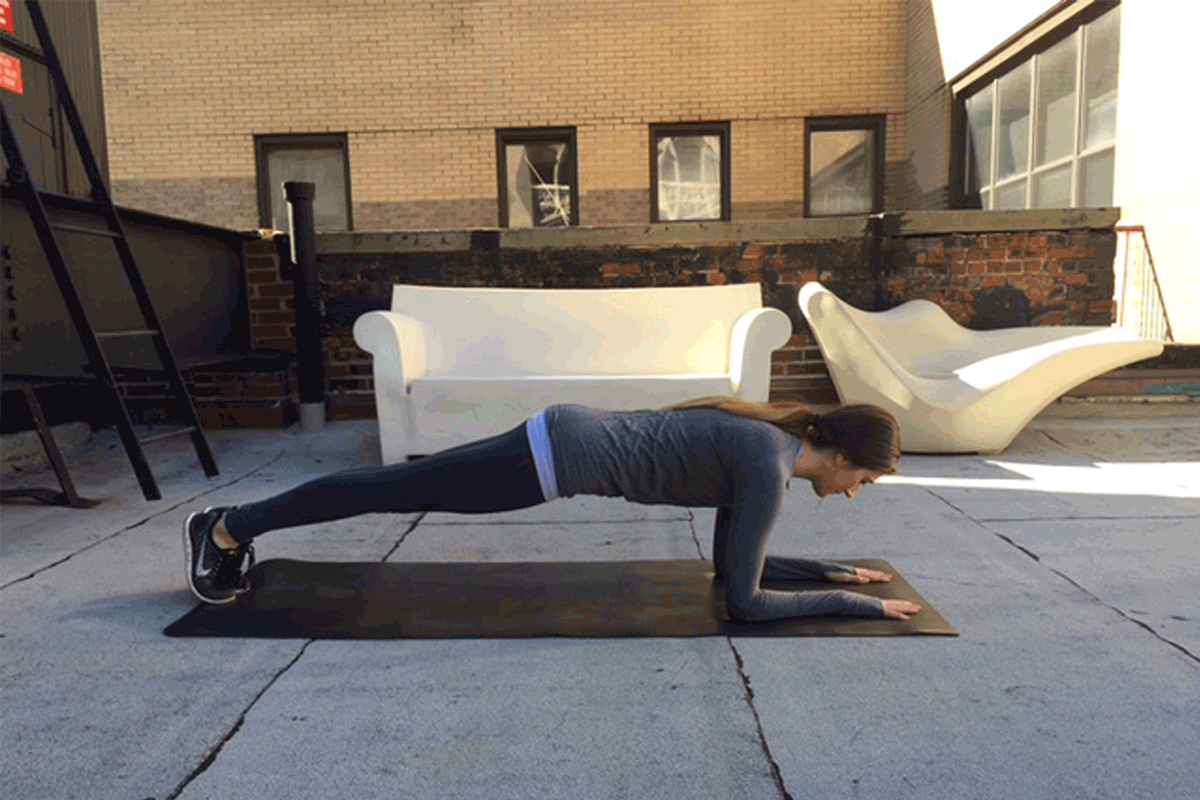
Side plank to forearm plank
If you thought plank was working only your core, think again. Plank can be a great exercise to target back fat. For an added challenge to this simple and effective exercise, begin in a forearm plank, and then slowly move toward a side plank on your forearms. For a modification in side plank, use the knee closest to the ground as a sort-of kickstand. “Push down [into the forearm] so you’re not dumping into the joints; you want to activate the muscles. That’s why we stack the joints,” Warner explains. (This is exactly how long you need to hold a plank to flatten your belly.)

Band pull-aparts
To complete a rep of band pull-aparts, stand with your feet hip-width distance apart, holding the ends of a resistance band in each hand with your arms extended straight out in front of you at shoulder-height. Be sure to relax your shoulders and pull them away from your ears as you squeeze your shoulder blades together and pull the band apart. Return to the starting position. Rosante recommends doing 15 reps to complete the set. (These 9 resistance band exercises will work your entire body.)

Lat pull-downs
Grab a resistance band and attach it to an overhead anchor, high enough so that there is full tension on the band when your arms are extended overhead. Reach up and take an end in each hand, then pull your elbows straight down to your sides. Reverse the motion to come back up to start. Rosante recommends 12 reps. (If you can’t do a pull-up, this easy workout plan will finally get you there.)

Rubbing butt cheeks
Winhoffer offers up this exercise to target back fat, but promises no actual glutes are involved. To complete this oddly named exercise, bring your arms out to your sides and bend the elbows slightly inwards, as though you’re holding onto two beach balls, making two half circles. Spread your fingers and bring your palms up towards the ceiling, then back down to face the ground. “So it’s like you’re rubbing two big buttcheeks!” Winhoffer exclaims. Do 30 of these. Here are more tips to get stronger arms without lifting any weights.
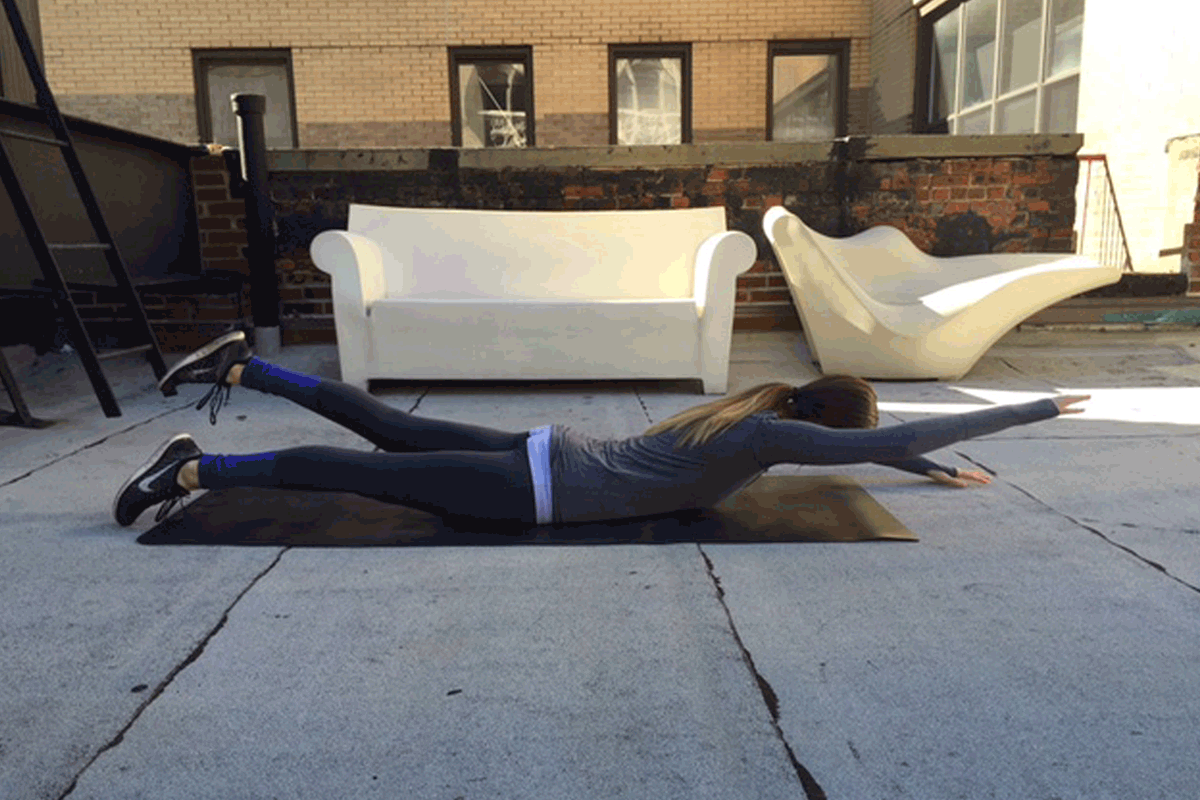
Swimmers
Warner recommends this floor exercise to work the arms and back while additionally strengthening the spine—a great combination for getting rid of back fat. Lying on your stomach, extend your arms and legs long. Begin to kick and paddle, lifting opposing hands and feet at the same time. Strive to lift the arms and legs equal distances off the floor, and keep your pelvis and shoulders square to the ground. Be sure to relax the neck by looking down at the ground, rather than straining it upward. (Here’s what you should be eating before your workout.)

Triangle pose
This yoga pose strengthens several parts of the body, even your trunk and upper body parts. (Here are some easy yoga poses you can do every day–even at your work desk.) Warner includes this stretch movement to target these areas. To practice this pose, come to a Warrior II position. Bring your legs out wide. Keep your back foot at a 90-degree angle as you turn your front foot out. Bring your arms out, holding them at shoulder-height, but keeping your shoulders relaxed. Your gaze should come out over your front hand. Slowly begin to reach forward, then start to come down towards your front foot. Lift your gaze towards the ceiling, ensuring you don’t collapse over the front leg—everything should feel activated, as though you’re reaching for both the ceiling and your front big toe. There is a line that runs through your chest, from the tip of one middle finger to the other.
A final word on back fat
While back fat is certainly annoying, Warner wants to remind us that the extra skin is there for us to maintain mobility. She also shares a personal story of a time when she was unhappy with the extra skin around her back. One of her favorite yoga teachers said to her, “Lindsey, show me the most flexible thing you can do with your shoulder… If you did not have that skin you were just grabbing, you would not be able to lift your arm and rotate and be as flexible as you are.” “Sometimes we forget that having that skin there is so that we can stretch,” says Warner. “If it’s too tight, you don’t have enough mobility. Realizing that made me feel way better!” (Need some motivation to exercise? Here are 11 tricks you haven’t tried.)