

13 Easy Quarantine Home Projects You’ll Wish You’d Done Sooner
Updated: Dec. 05, 2022
You don't have to be a DIY expert to pull off these simple projects that can make a huge difference in your home.
Small projects, big results
You know what they say about idle hands: They only get us into trouble, and that’s the last thing we need during a pandemic. Put your extra time and energy to good use by tackling a few home DIY projects—you know, the ones you’ve been meaning to do forever but never managed to get around to. Not only will they help you to pass the time, but some of them could increase your home’s resell value in the future.
Any update, no matter how big or small, can have a positive impact, notes Tom Kraeulter, host of the podcast The Money Pit. Some, however, offer more bang for your buck. “Projects like kitchen or bath updates, along with outdoor-living improvements, typically deliver the best ROI when it comes time to sell—sometimes upwards of 60 percent,” he says. “Plus, with COVID-19 impacting virtually every area of our lives, there’s so little we can control right now. Accomplishing even a small project creates a great deal of satisfaction that continues to grow as you enjoy the results of your labor.”
From upgrading your bathroom’s backsplash to giving your front door a fresh coat of paint, here are a few incredibly easy projects that can perk up your home. No professional experience required!
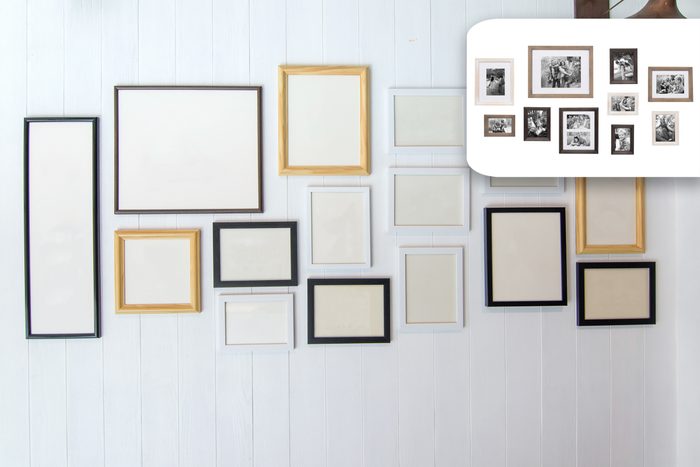
Put up a gallery wall
Admit it: Those framed photos have been sitting there for months, if not years. You’ve always wanted to create Instagram-worthy gallery walls, but it seemed so daunting. The good news is that this project isn’t as hard as it seems. And with some extra time on your hands, Ward Schraeder from HGTV’s Bargain Mansions says now’s the time to tackle this statement-making display.
What you’ll need: Framed photos and prints of your choice, hanging materials (screwdriver, screws, etc.), a piece of string, and a key.
Step 1: Find a piece of string as long as the vertical spread you want between the frames. Attach a key to the end of the string and thumbtack it on the centerline of the first row of pictures. The weight of the key helps to hold the string straight. Move the tack to the edge of the frames, allowing the string to give you a level indicator.
Step 2: Space your nails evenly along the string, tap them into the wall, and hang your picture frames. Create a new string line and repeat it for the next row of frames.
Step 3: Fill in any tack holes with a little white toothpaste.
Here’s more on how to hang pictures perfectly—and avoid 9 common mistakes.
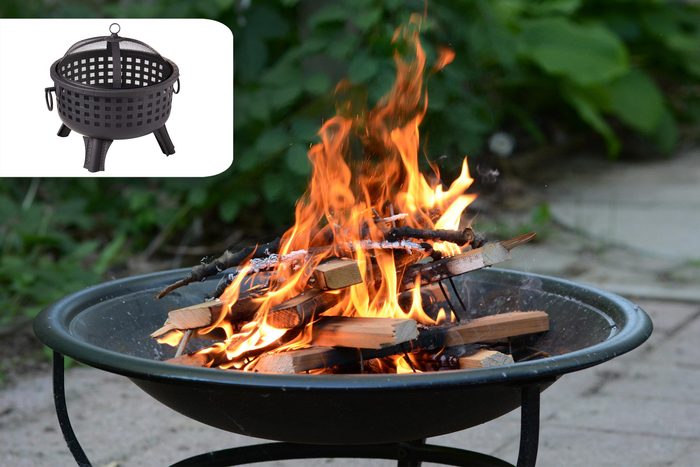
Set up a fire pit
More time indoors makes us want to retreat outside more than ever. If your space allows for it, a fire pit can create a cozy, welcoming environment that’s perfect for bonding with family and friends. Kraeulter adds that it also spruces up your whole outdoor living area. Best of all, fire pits can be cost-effective if you buy a ready-made one, rather than building your own.
What you’ll need: A safe space for the fire pit to stand, appropriate kindling, a fire extinguisher, camp chairs, and a storage ottoman.
Step 1: First things first—choose your outdoor location carefully. Since open fires can get big fast, you’ll need more space than you think. As Kraeulter explains, radiant heat can melt vinyl siding 15 feet away, and you’ll also need extra space to escape the smoke and sparks. “Clear the area around the fire pit of anything that might make for good kindling, and never use a fire pit under any structure covered by a roof,” he advises.
Step 2: Gather or purchase burn-only hardwood like oak, poplar, or maple. Avoid newspaper, trash, and paper towels; Kraeulter says those will create huge, flaming, and dangerous embers. Make sure to have an extinguisher handy, just in case.
Step 3: Now, set the scene! Add comfortable chairs to sit in, outdoor blankets, s’mores kits, and more. An outdoor ottoman is a great idea so you can stylishly store your goods, too.

Create a cozy reading nook
Ah, a space just for you, your imagination, and all of the wonderful characters your favorite authors have dreamt up. Creating a cozy and attractive spot like this can also benefit your mental health, says Raf Howery, the CEO of Kukun. This is always true, but perhaps even more so now that we’re confined to our own homes.
What you’ll need: An oversized comfortable chair, soothing paint color or removable wallpaper, unscented candles, natural lighting, and throw pillows or blankets.
Step 1: First, find the space. Howery suggests any small area that’s big enough for a plush chair and can yield some sort of privacy. The best area would be near natural light to boost your mood.
Step 2: Now, set the scene. This really depends on the person, Howery reminds, since everyone will be comforted by something different. Some ideas include soft pillows or throws, string lights, and unscented candles (since some people are sensitive to strong formulas). The goal is to create a place that you can spend hours relaxing and reading.
Step 3: To take it a step further, consider painting the walls of your nook a muted blue or green. Or, for less of a commitment, removable wallpaper is a solid choice, too. Now for a fun question: What should you put on your reading list? Start with these 100 books everyone should read in their lifetime.
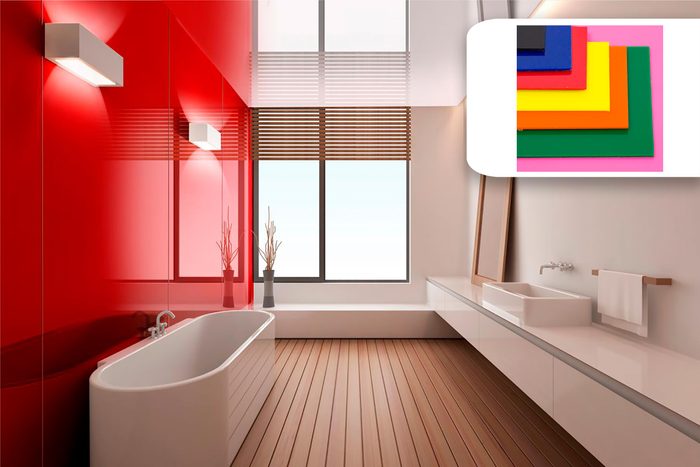
Give your bathroom backsplash a little shine
Many people consider their bathroom a place to detox, relax, and regroup. After all, a stressful day can instantly be made better with a long shower or bath. Carmelo Marsala, the CEO of Spray-Net, says an easy way to upgrade your bathroom is to paint a piece of plexiglass. It adds shine and dimension to an otherwise simple wall.
What you’ll need: A piece of plexiglass cut to the size of your bathroom backsplash, glue for plexiglass, paint brushes and rollers, interior paint, and paint tape.
Step 1: Order a piece of plexiglass that is the same size as your bathroom’s backsplash.
Step 2: Marsala says the trick is to paint the back of the plexiglass. Because it won’t be exposed to anything and just serves as the color, it can be any style of interior paint you’d like. Let it dry after a few coats. “The result will be a shiny backsplash or feature wall that looks like a glossy, smooth epoxy finish for a fraction of the price and in a fraction of the time,” Marsala adds.

Upgrade your bedroom ceiling
How many times have you laid in bed, restless, wishing you were falling asleep under the tapestry of stars? With this easy DIY project, you can do just that. As Elizabeth Rees, the founder of Chasing Paper, explains, a little bit of wallpaper goes can go a long way and turn your bedroom into an oasis.
What you’ll need: Constellation or star-themed removable wallpaper, a ladder or step stool, and an X-ACTO knife.
Step 1: Using a ladder or step stool, line up the straight edges and corner of the removable wallpaper panel with the edges and corner of the ceiling.
Step 2: Peel the wallpaper from the backing in two- to three-inch sections at a time, smoothing the wallpaper flat as you go.
Step 3: Using the first panel as a baseline, line up the next panel of wallpaper so that it is even with the first panel. Repeat the peeling, sticking, and smoothing process from Step 2.
Step 4: Repeat Step 3 until you have reached the other edge of the room, adhering the wallpaper up to the edge of the ceiling that meets the wall.
Step 5: Use an X-ACTO knife or a rotary cutter to trim the excess wallpaper.
While your mind’s on your boudoir, try these 10 easy ways to make your bed 10 times cozier.
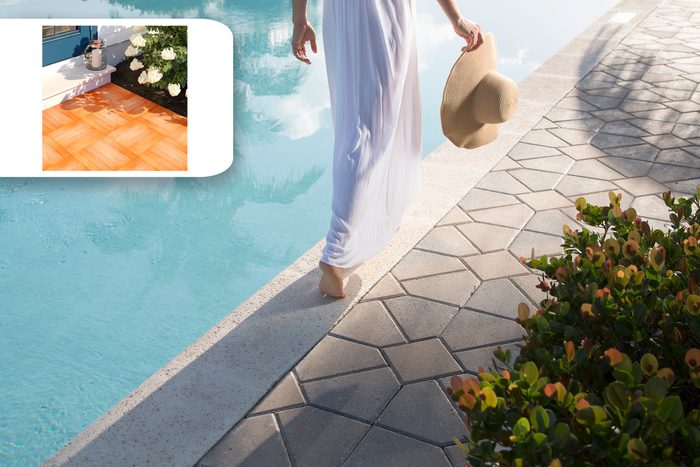
Transform your outdoor area
For coffee in the morning, reading in the afternoon, and cocktails at night, your outdoor space is an extension of your home. And with more time to dream big, outdoor-living expert Tyler Banken suggests brainstorming the functionality of this area. Whether you have a patio, deck, or apartment balcony, small changes can make a big impact. To begin, look down! Changing your deck tiles can add style and dimension instantly, and set the stage for the decor of your choice.
What you’ll need: Deck tiles, a tape measure, and a jigsaw if needed.
Step 1: Take the square-foot measurements of your outdoor seating area. Many deck tiles are sold as one-square-foot pieces, so order accordingly. Banken suggests buying a few extras, just in case there is damage or you make a mistake.
Step 2: Choose a corner as your starting point and start interlocking the tiles, using rings or pins, whatever is included in your order.
Step 3: If you need to cut some tiles to ensure a proper fit, Banken suggests using a jigsaw tool (along with the proper safety equipment).
Step 4: After you’re finished, add your seating! From rocking chairs to outdoor bean bags, get cozy outdoors, however, you’d like.
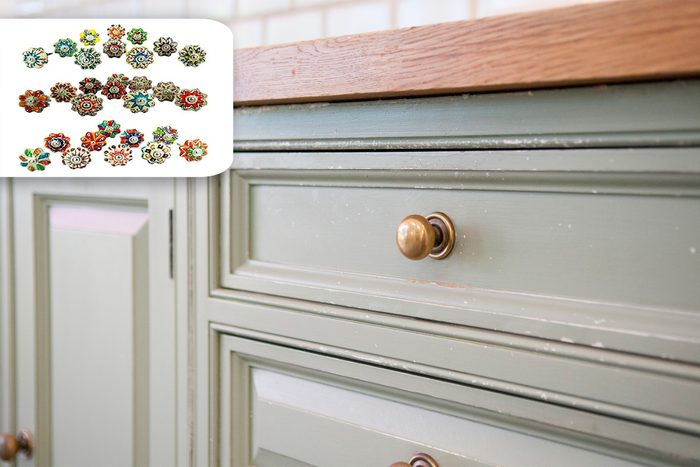
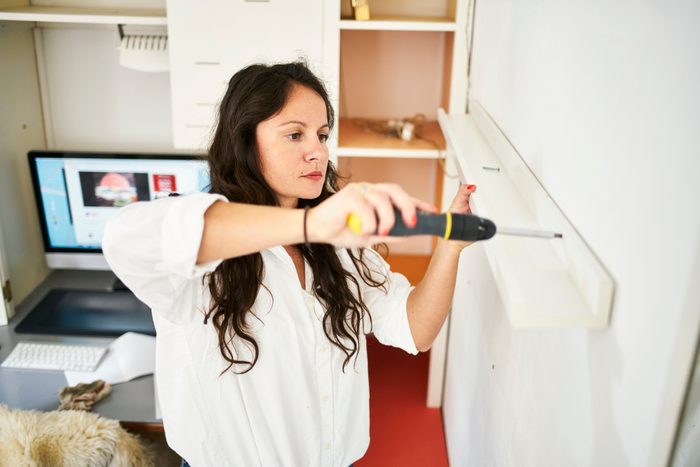
Replace cabinet hardware
When clients ask interior designer Mark Cutler for an easy way to upgrade and change the feel of their house without spending too much, he always suggests switching out cabinet hardware. “This is particularly effective in rooms like your bathroom or kitchen, and this little detail can make a huge difference. In fact, I often will change mine from summer to winter—it makes that big a change,” he adds.
What you’ll need: A screwdriver and/or power drill and new hardware.
Step 1: Trust us—this one is easy. The first step, of course, is shopping. Cutler says to figure out if you have single-hole hardware (like knobs with one screw) or two-hole hardware (like pulls). If you have the latter, measure the distance between the holes so you can shop accordingly.
Step 2: Using a power drill gets the job done quickly, says Cutler. If you have kids, though, it can be fun to teach them how to use a regular screwdriver and do the project together. Maybe you can even let them pick something new for their room!
Step 3: Before you use the pulls or knobs, triple-check that they are secured tightly, so they don’t come off and damage your cabinets or doors.

Start a compost pile
Since you’ve been cooking at home more lately, you’ve probably been noticing your food waste more. Rather than tossing out the scraps or expired produce, try creating a compost pile, suggests Blythe Yost, co-founder and head designer for the online landscape design company Tilly. Not only is it a project that supports Mother Nature, but you can also use the compost to plant flowers or nurse your indoor plants.
What you’ll need: A small canister and a larger canister, or plywood to create your own.
Step 1: Find the right canister. Yost says this depends on where you’re going to put it: On the kitchen counter for the kids to fill up? On the back porch to save on space? The size should be based on how often you’re throwing out food, stems, and so on.
Step 2: Create a large compost site outside. Since this can become quite smelly, Yost recommends a bigger area for the weekly canister dumps. You can make this yourself out of plywood, or you can purchase it.
Step 3: Use it! The whole point of a compost pile is to actually turn waste into useful goods. Once it’s had a month to decompose, start incorporating it into your soil and watch the blooms flourish!

Switch out air vents
Remember those things? You have them, of course, but you likely don’t pay any attention to them. However, Cutler says they can make a statement if you let them. It is often the small details around your home that make a huge difference when you give them a little TLC, he explains. Simply swapping air vents can add style, color, and character to your home.
What you’ll need: New air vents, a screwdriver, a rag, and a cleaning solution.
Step 1: Figure out what type of air vents you’ll use. Maybe something that’s a pop of color? Or a textured pattern? Cutler says to be sensitive to the style of your home—whether it’s traditional, mid-century, or contemporary. Also make sure to measure them, so they fit upon arrival.
Step 2: Gently pull out your old air vents and clean the space around them with a rag and cleaning solution.
Step 3: Replace with the new air vents, and if needed, screw them into place.
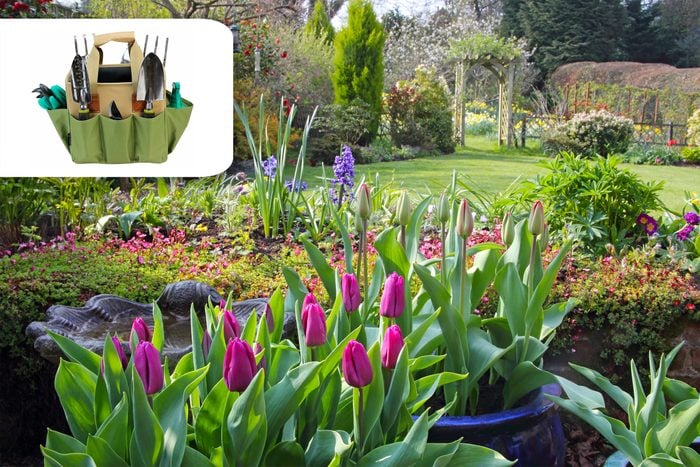
Redesign your garden beds
Talk about curb appeal! Now that you have some extra time and a desire to spend more time in the great outdoors, consider giving your flower beds more thought. As Yost explains, there are many approaches to take: While plants in a straight line will often have a more formal feel, plants in a curved line will feel more casual. “Make sure to understand how much space the mature plants you are using need and how much sunlight your space gets. Considering these things will help make sure you are set up for success,” she adds.
What you’ll need: Plants that will grow in your yard with the sunlight and rain you receive, soil, and a gardening set, including gloves and a shovel. You’ll also need wood or stone if you want to frame the area.
Step 1: Figure out where your flower gardens will come to life and, of course, what you’ll plant. Yost suggests an area where there’s some sun but not too much. And overall, you’ll want to consider how much time you want to give to your outdoor craft. If you’re someone who doesn’t mind tending to them once a week, high sunlight is fine. But if you want to be more hands-off, consider plants that don’t need frequent attention. If you don’t have a lot of sunlight, try these 9 colorful flowers that grow in shade.
Step 2: Lay out the soil and dig holes as necessary, depending on the shape you want to make. If you want to stay clean, put on gloves and use a shovel. Otherwise, use your hands.
Step 3: Once you have planted all of the flowers and/or plants, give them some water.
Step 4: For an extra project, frame the area with wood or stone.
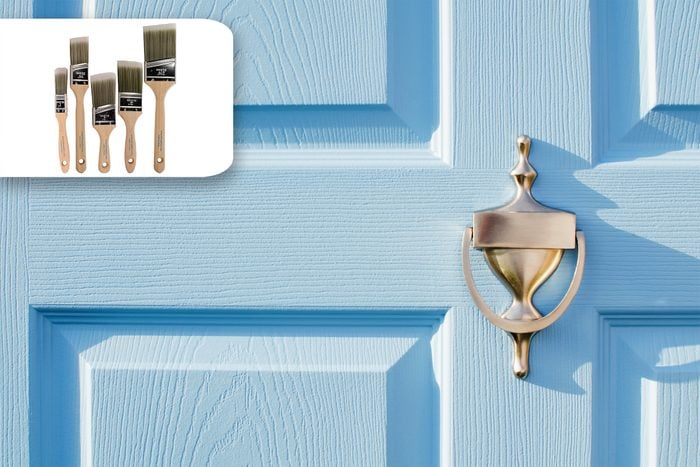
Paint your front door
Painting your front door is an easy way to add some character to your house. And you’ll be surprised by how this easy change can shift the whole feel of your home, Yost says. Plus, exterior paint colors could boost the value of your home.
What you’ll need: The color of your choice, professional paintbrushes, foam rollers, a drop cloth, painting tape, sandpaper, a clean rag, and a screwdriver.
Step 1: Remove the hardware and wipe down the door with a clean rag.
Step 2: Then, apply primer using a roller to create an even surface on the panels and a brush for the trim or details. Allow the primer to dry completely.
Step 3: Now, it’s time to paint! Yost suggests using a foam roller or brush to create a hand-painted look. If you want, consider painting the trim a different shade to compliment the color of the door.
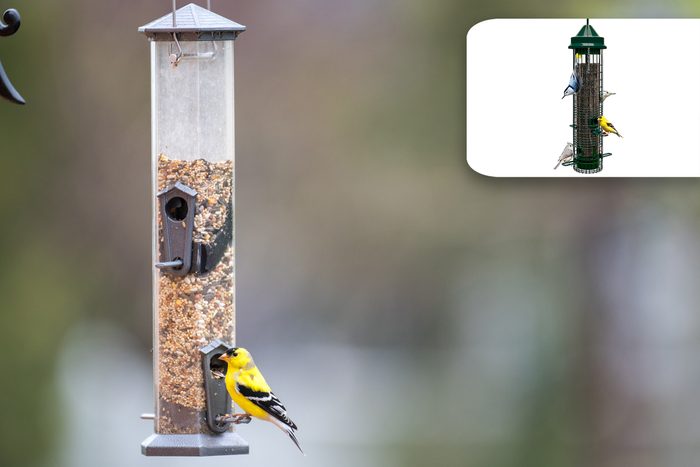
Set up a squirrel-proof bird feeder
While many people like the idea of having a bird feeder to watch these friendly creatures visit every day for some grub, they also complain that squirrels often take over. Since you’re buying bird food and looking for a peaceful experience, this can be a serious bummer. Don’t give up, though! Kraeulter says you can solve the issue by shopping smartly and positioning your feeder perfectly.
What you’ll need: An anti-squirrel feeder, bird food, and hanging materials.
Step 1: The most important part of this project is finding the right place to hang your feeder. Kraeulter suggests a deck, tree, or a spot right outside your window for great close-up views.
Step 2: Once you’re set-up, fill the feeder to the top.
Step 3: That’s it! A squirrel-fighting feeder works by closing the seed port to bigger animals, making sure your feathered friends are the only ones that can access the food. It can surround your space with nature and wildlife, all while cutting back on your annoyance level, too.
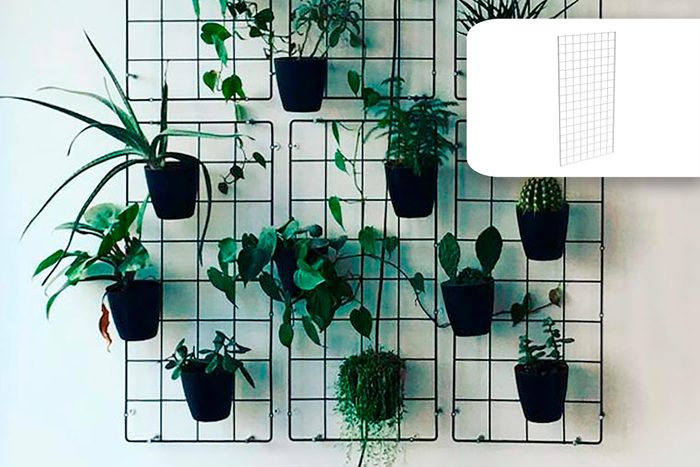
Create a vertical garden
The problem: You want to be a plant parent, but you don’t have much space. The solution: Go vertical! It can be an easy afternoon project that adds life and color to your home, says Marsala.
What you’ll need: A metal grid, hanging planters, indoor or outdoor plants, and water.
Step 1: Order the metal grid, and decide if you’ll place it inside or outside your home.
Step 2: Hang the hanging planters on every grid or every other grid, depending on the style you’d like to create.
Step 3: Fill the planters with plants of your choice, based on the sunlight they will receive. By the way, these are the 12 easiest foods to grow at home during quarantine.
Step 4: Water—and enjoy!
For more smart strategies, see our comprehensive Coronavirus Guide.