

How and When to Repot a Plant

Updated: Jan. 09, 2023
With the right potting soil and container, plus a gentle hand, you can add years to the life of your houseplants
Some plants grow slowly, and some grow quickly, but sooner or later most houseplants get too big for their containers—even low-maintenance indoor plants. One tip-off that repotting is needed: Indoor plants may look too big for their pots. Another clue is when roots come out of the top or bottom of the container, signaling that the roots are overcrowded. Overcrowded roots make plant watering difficult, which can lead to root rot and a dead plant. Learning how to repot a plant is not difficult, but it does require using containers of the correct size, an appropriate soil mix and a gentle hand. “Once you’ve done this a few times, you’ll realize how easy it is,” says Katelyn Ginsberg, co-owner of Primex Garden Center in Glenside, PA.
Signs a plant needs to be repotted
You should repot a plant when its roots have become overcrowded. If roots run out of space to expand, they may end up circling the inside of a pot, creating a tight mass that makes it difficult for water and fertilizers to penetrate. One sure sign of overcrowding is that roots have grown out of the top of a container or out of the drainage hole at the bottom.
Other tip-offs: When you water, the liquid pools on top of the pot. Or a plant wilts even when watered regularly—this can mean a dense root mass is preventing H2O from reaching individual root ends. Similarly, if leaves look unhealthy, this could be an indication that overcrowded roots are interfering with a plant’s ability to take in nutrients, says Byron Martin, co-owner of Logee’s Greenhouses, a mail-order and in-store plant nursery in Danielson, CT. Overcrowding makes proper watering difficult and can lead to root rot, insect infestations like fungus gnats—and a dead plant.
Another time to repot is when the plant has grown so much that it overwhelms its container, Martin says. These plants look out of proportion to their pots and are at risk of toppling over. They may also have overcrowded roots.
Materials needed to repot a plant
Knowing how to repot a plant is an important skill for plant owners. “Most plants need to be repotted about every couple of years,” says Ginsberg. And some fast-growers should be transferred to new pots even more often, including popular low-light indoor plants such as spider plants, pothos and dumb canes.
Here’s the equipment you’ll need:
Potting soil
The potting mixes you buy in stores are suitable for most houseplants. These soilless blends generally contain peat moss (a dark brown, stringy substance that holds water and releases it slowly into a pot), perlite (small white balls that add air space to the container), vermiculite (shiny slivers that help retain moisture) and sometimes lime (a white powder that lowers the acidity of the mix). “As long as the mix provides aeration—air spaces—the plant should be okay,” Martin says. The biggest no-no is potting plants in outdoor garden soil. “Garden soil becomes compact and prevents good drainage,” explains Ginsberg.
A new, slightly wider pot
Plants remain healthy when they are moved into a pot that’s only slightly wider than their current home, so choose a new pot that’s one to two inches wider than the original. “The most frequent mistake people make when repotting is putting a plant into a much bigger new pot,” Ginsberg says. With a too-large pot, you end up with lots of soil where there are no roots to absorb water. This soggy soil can easily lead to root rot.
The best pots to put your plants into are terra cotta. While they are expensive, heavy and easily broken, clay pots gradually release moisture in the soil mix, cutting down the chances of your potting mix becoming water-logged. “Terra cotta pots help keep root rot at bay,” says Martin. Cheaper plastic pots or fancier glazed pots are fine if you’re careful about watering, because they retain moisture longer than terra cotta. But always avoid pots without holes, because water can collect at the bottom of these containers.
Gloves
Gloves are a necessity if you’re transplanting a plant with spines or thorns (such as a cactus). They’re also a good choice to keep your hands clean as you learn how to repot a plant. If you’re wearing them to work with multiple plants though, be sure you aren’t accidentally spreading pests like aphids from plant to plant as you go.
Tools
Tools such as small trowels and scissors or clippers to snip off roots and damaged leaves will make it easier to handle the delicate parts of your plant as you repot.
How to repot a plant
Sterilize new pot and tools
If your container has been used before, wash it with a mix of one part bleach to 10 parts water to ensure that you don’t spread diseases, recommends Lisa Eldred Steinkopf, aka “The Houseplant Guru,” a blogger, lecturer and the author of Houseplants: The Complete Guide to Choosing, Growing, and Caring for Indoor Plants. Clean your tools with the same type of solution.
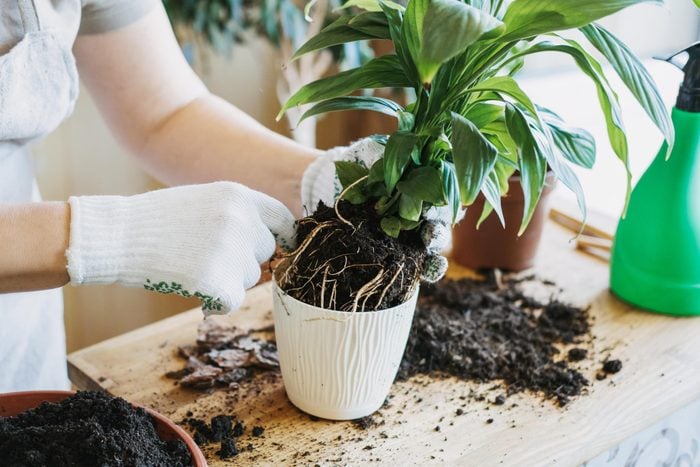
Remove plant from container
Spread out a working surface that can be cleaned or tossed, such as a tarp, newspaper or large plastic bag. Or simply move everything outside. Water the plant a little bit—slightly moist soil makes it easier to remove. Put the pot on its side, tap it and wiggle the plant out, if it doesn’t simply fall out. Make sure your movements are gentle so you don’t break off any roots. “People get nervous about removing a plant from its pot, but it’s not really hard,” Ginsberg says.
Untangle the plant roots
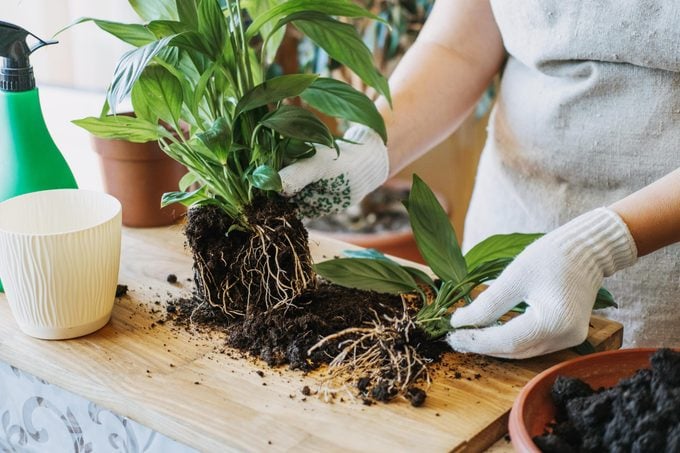
Trim off any dead or diseased-looking roots. Loosen up or massage the roots, especially those in the bottom of the pot. “If there are roots growing in a circle, break them up and pull them out so they will grow downward once repotted,” suggests Ginsberg. With your fingers, remove the old soil mix from the root ball so it doesn’t create a bump that can collect water.
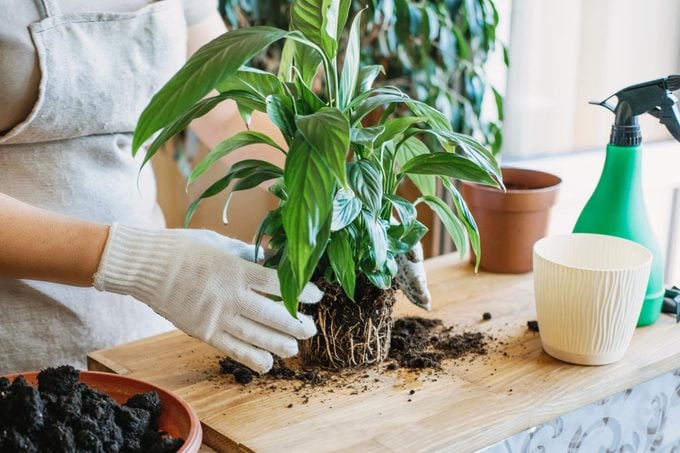
Repot the plant

Put an inch or so of potting soil on the bottom of the new pot. Feel free to reuse the old container mix, as long as your plant looks healthy—not showing signs of powdery mildew or brown tips on leaves—and the soil is not compacted. Hold the plant with your hand so that it’s about one inch below the top of the pot. This ensures that H2O won’t overflow when you water the plant. Fill empty spaces in the pot with the mix. Finally, tamp down the potting soil to settle it and remove big air pockets.
Water the plant thoroughly
“Give the plant a good drink of water after repotting it. This settles the soil,” Martin says. But wait a month or so before you fertilize the plant, cautions Ginsberg. It will stress the plant too much.
Tips for repotting a houseplant
Here’s more advice on how to repot a plant.
- Try to get the timing right. “Repotting is best when roots are in active growth, which generally means spring to fall,” Martin notes.
- Don’t immediately repot a plant you obtained from a garden center or plant subscription box. Moving the plant from its original environment already caused stress, so repotting the plant will add to the trauma, says Ginsberg. You can leave the plant in its nursery container for six to 10 months, to let it adjust to a new environment. If you want a more attractive look, slip the nursery container inside a nicer-looking pot that’s slightly bigger.
- If, against expert advice, you want to use a container with no drainage holes, start by putting down a layer of activated charcoal. This will absorb water and, in theory, prevent your plant from sitting in soggy soil, according to Pistils Nursery in Portland, OR. “People who don’t use drainage holes are brave people,” Steinkopf says. For a less risky alternative, keep your plant in a pot with holes, then slip it into a more attractive pot without them. When you need to water, take the smaller pot out, soak it, let it drain, then return to the container with no holes.
- If you like your current plant-pot combo, you can maintain an overgrown plant in its current pot by pruning the roots, Martin says. You can take the plant out of its pot and cut back up to two-thirds of its roots. Since plants vary in how sensitive their roots are, do some research before you start hacking. Just like repotting, successful root pruning can help your plants thrive so they’re a part of your life for a long, long time.
Sources:
- Katelyn Ginsberg, co-owner of Primex Garden Center in Glenside, PA
- Byron Martin, co-owner of Logee’s Greenhouses, a mail-order and in-store plant nursery in Danielson, CT
- Lisa Eldred Steinkopf, blogger, lecturer and author of Houseplants: The Complete Guide to Choosing, Growing, and Caring for Indoor Plants
- Washington Post: “How to Repot Plants Without Killing Them“
- Pistils Nursery: “How to Plant in a Pot Without Drainage Holes“
- Express: “‘Splash of colour’ 8 of the fastest-growing houseplants for an instant indoor garden“


Originally Published: December 01, 2022