

How to Organize a Junk Drawer So You Can Actually Find What You’re Looking For

Updated: Apr. 08, 2024
Follow these expert-recommended steps to get your junk drawer under control
Everyone has one: the ubiquitous kitchen junk drawer. It’s a place where birthday candles and tape measures mingle. Band-Aids and chip clips run amok. And somehow, every odd cooking utensil, gift bag and quirky dish towel ends up stashed in the drawer, along with an assortment of other random objects. It’s a catchall for items you need in the kitchen but rarely use—and those you barely need but can’t part with. Can anything be done to get a handle on this junk drawer of mysteries that don’t seem to fit anywhere else?
Between kitchen cabinets, pots and pans and pantry storage, it’s easy to forget the junk drawer in your kitchen organization quest. But just like any of our kitchen storage ideas, you’ll want to create a system for managing clutter. Just as there are plenty of ways to approach fridge organization, there are many methods for organizing a junk drawer. Here, we break down the steps that many experts employ to combat this drawer of disarray.
Get Reader’s Digest’s Read Up newsletter for cleaning, travel, tech and fun facts all week long.
1. Remove everything
The very first thing you’ll want to do is take everything out of the drawer. “I like to have extra boxes on hand to dump everything into,” says Shantae Duckworth, professional organizer and founder of Shantae-ize Your Space. “That way, it doesn’t feel overwhelming with stuff all over the place.”
2. Clean the drawer
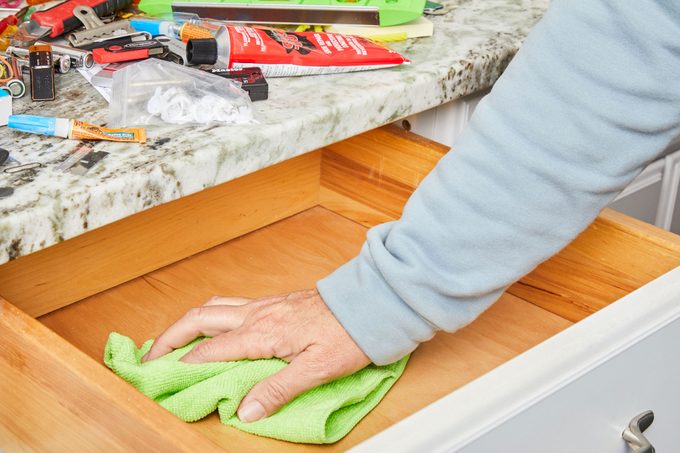
Before you begin sorting, saving and dumping, you’ll want to clean out the drawer to create a fresh space for your things to move back into. Use a handheld vacuum to remove dust and crumbs, then choose your favorite cleaning products and a microfiber towel to wipe away all the dust and grime. “I like to use a simple all-purpose spray cleaner and a dish towel and make sure to wipe down the drawer,” says Duckworth. If you have any organizational pieces already in place in the drawer, make sure to remove them and clean those as well.
3. Assess the situation
Lay all the junk drawer items on a flat surface and on top of a towel or paper towel. Use a damp cloth or wet wipe to do a quick swipe and clean the items—you don’t want to add unwanted grime back to a clean drawer.
4. Create piles
Now is the time to separate items into three piles: Donate (or give away), trash (or recycle) and save. The first two piles are for items you want to get out of the house in one way or another, either by tossing them or giving them to people or organizations through donating, scrapping or regifting (here’s what professional organizers always toss). The third pile is for all the items you plan to put back in the drawer or place somewhere else in the house. Start thinking of the junk drawer as one of importance: If it’s not something you use at least occasionally, it doesn’t belong in your central supply drawer, says Nicole Gabai, founder of B. Organized!
5. Start separating
Just like when you organize your closet or sort through a linen closet, separating items into their respective spaces is essential. Once you’ve made your piles to toss, recycle, donate or regift, you’ll want to focus on the items that stay in your house. “Organize the items that should go somewhere else by room in the house,” says Chantelle Hartman Malarkey, a lifestyle photographer and influencer. Ask yourself the following questions, she says: “Should this item live in the garage, like a nail or measuring tape? Should this item live in the den, like a paper clip or pen? Should this item live in your bathroom, like hand cream or lip balm?” If the answer is yes, move the item to the location it should be in.
6. Bring in organizational tools

Once you’ve re-homed items throughout the house, move your focus back to the junk drawer. Choose the right organizational devices, including the best drawer organizers, to help you place items back in an orderly manner. Professional organizer Mattie Sheppard suggests having clear drawer storage bins in an assortment of sizes to accommodate any drawer in your kitchen. “You can also purchase an adjustable drawer organizer,” she says. “Whatever you decide, just make sure you have the necessary organizers ahead of time, so you can keep organizing without any lag time.”
7. Make your selections
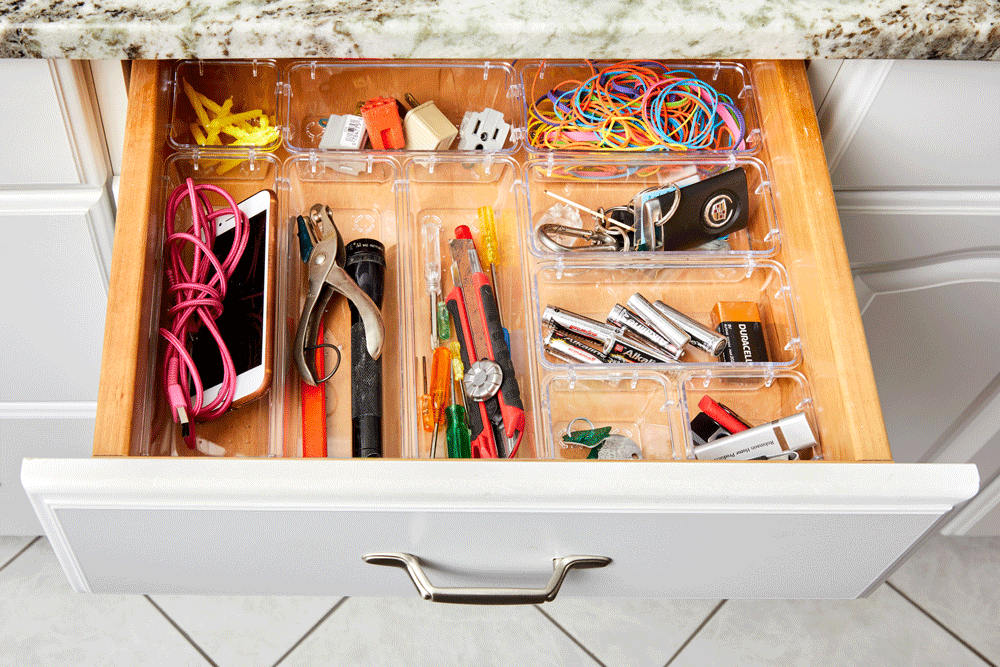
When selecting items to go back in the drawer, pick ones that you need on hand in the kitchen but probably don’t use very often, such as scissors, rubber bands, bag tags and other items you sparingly need quick access to. “The junk drawer should be a catch-all space for small miscellaneous items,” says Duckworth. “Its purpose is to help you organize and store items that you might need occasionally, but that don’t warrant their own specific storage location.”
8. Organize within the drawer
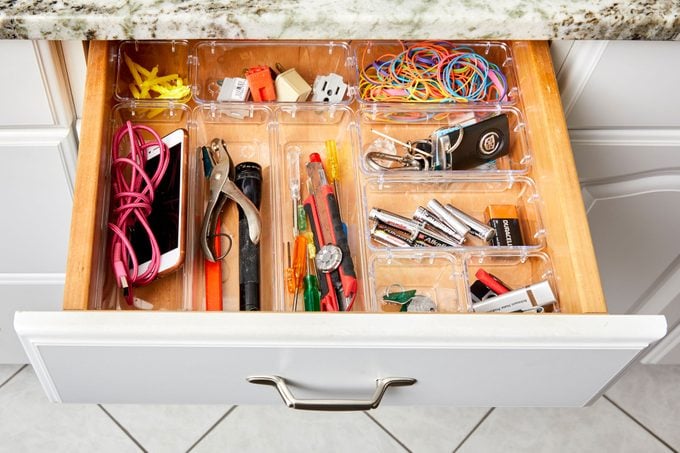
Once you’ve made your selections, begin placing like-items within their appropriate bins in the drawer. Be sure that the items placed there make sense paired together in each compartment. Remember, says Malarkey, you want to make sure you can see everything and have easy access. “This includes having all these items visible and in reach. Organize by type of item. There is nothing worse than having to dig and search for supplies when you are trying to grab something quick.”
Once you’ve organized within the drawer, review all the items that you have placed there. Does anything need adjusting? Should that sewing kit actually be in the laundry room? Can those batteries go in a designated box in the utility closet? Make adjustments and continue to be picky about what you place—and keep—in the ubiquitous junk drawer.
About the experts
- Shantae Duckworth is a professional organizer and founder of Shantae-ize Your Space. She worked in the hospitality industry for 15 years before starting her company and bringing her home-organizing expertise to clients in 2021.
- Nicole Gabai has more than 20 years of hands-on organizing experience. She founded her company, B. Organized!, to create order out of chaos and offer customized solutions for her clients, which include small business owners, full-time moms, educators, attorneys and more.
- Chantelle Hartman Malarkey is a lifestyle photographer, influencer and interior designer.
- Mattie Sheppard has been staging, cleaning and decluttering spaces for more than 13 years in various capacities. She is the owner of Perfectly Pictured Decluttering & Staging Experts and the strategic interior design advisor at Real Estate Bees.

Originally Published: October 11, 2023