


How to Propagate Houseplants

Updated: Jan. 03, 2023

Even newbie plant parents can birth leafy babies if they know how to propagate plants
If you follow a lot of plant influencers online, you’ve probably seen propagation in progress. Jars containing snippets of plants can look like complex horticultural experiments, but even newbies can learn how to propagate and grow a new plant from an existing one. It’s the perfect pocketbook-friendly and practical way to expand your leafy indoor jungle and offer green gifts to guests and loved ones.
Provided you have a healthy rather than near-dead plant, you can propagate a wide variety of finicky and low-maintenance plants—tall plants, small plants, low-light indoor plants and more. There are several methods of indoor plant propagation, with the most popular—and, arguably, most straightforward—being propagating from a cutting.
Read on to find out how to propagate plants from simple stem cuttings in soil or water. Then try it out on your favorite living room plants.
Get Reader’s Digest’s Read Up newsletter for humor, cleaning, travel, tech and fun facts all week long.
What is propagation?
Before you learn how to propagate, make sure you’re familiar with the concept. Let’s start with the basics: What does propagate mean?
Plant propagation is the process of creating a new plant, and it can happen in two ways: sexually or asexually. Sexual propagation occurs through the natural growth of viable seeds, while asexual propagation allows for the creation of new plants using cuttings from vegetative parts, like the roots, leaves and stems.
Christopher Satch, a horticulturist and professor with the New York Botanical Garden, says that knowing your plant helps a lot when working out which propagation method will work best. “For example, cacti are best propagated by seed, as they produce thousands of seeds from one flower,” he says. “Aroids, like pothos and monstera, rarely bloom, so they are best propagated by cuttings. And of course, most oncidium orchids and other rhizomatous species are best propagated by dividing the plant.”
The process of propagation by leaf cutting is similar to that used for stem cuttings and works for species without stems, like popular snake plants. One big benefit of propagating from cuttings rather than via seeds is that you’re guaranteed to get an identical plant to the mother species—handy when you have a striking variegated plant. Plus, plants from cuttings often mature and flower faster than seed-grown varieties.
Whichever method you opt for, you need a healthy plant and the right conditions to succeed.
Propagating in soil
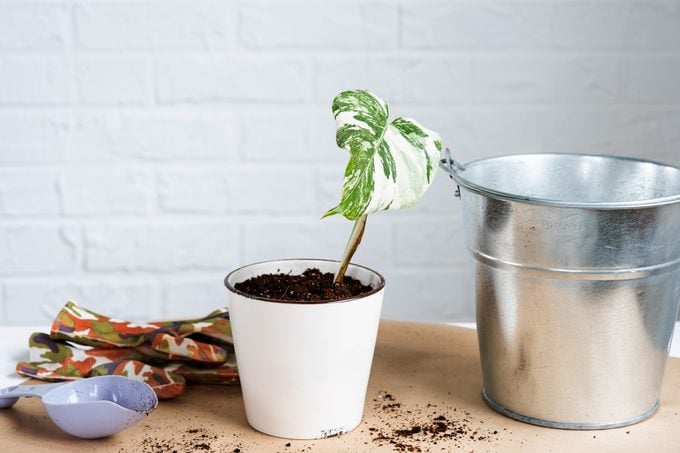
Learning how to propagate from stem cuttings in soil isn’t too tricky. You’ll need to follow the steps below, though, and ensure your environment offers the appropriate conditions.
What you’ll need
- Container with drainage holes
- Loose, well-drained rooting medium
- Sharp knife, scissors or pruning shears
- Clear plastic bag
- Two to four straws or thin wooden stakes
- Rooting hormone (optional)
- Pencil
- Gloves (optional)
How to propagate in soil
Excessive water loss is a big killer of cuttings. Water the plant well the day before and take the cutting in the morning, before the day’s heat absorbs too much moisture. The exceptions to this rule are drought-tolerant succulents and cacti.
- Cleanly cut off a healthy 4- to 6-inch stem from new growth. Make sure the base of the stem contains a healthy node (the bump from which buds and leaves sprout). Always use sterile scissors, shears or a knife, and wash your hands thoroughly or wear gloves to avoid spreading pathogens to the cutting.
- Remove up to two-thirds of the leaves at the stem’s base. There should be only one to three leaves left on the upper part of the cutting. This helps direct energy and moisture to root growth.
- Get rid of any flowers, buds or fruit. These draw energy away unnecessarily.
- Dip the cut base into rooting hormone. You don’t have to do this, but it can help ensure your cutting takes root.
- Fill a container with a damp (not saturated) rooting medium. You want something that absorbs appropriate amounts of air and water. An equal mix of vermiculite and perlite works well, but any well-drained, soil-less potting mix will do the trick.
- Use a pencil to make a hole, and insert the cutting. Cover an inch or two of its base with the rooting medium to firmly hold it in place. Make sure you fully cover the bottom node in the rooting medium and verify that no leaves are touching the soil surface.
- Cover the container with a clear plastic bag to seal in humidity. Make sure the bag doesn’t touch the leaves or stem by inserting straws or wooden stakes. Alternatively, sit the cutting next to a humidifier.
- Position the pot in a spot with bright but indirect light, the indoor plant lighting that will give your cutting the best chance to succeed. Avoid temperature extremes. An environment that keeps the potting medium warm but not hot helps with root formation. Ideal temperatures are around 60 to 75 degrees.
- Keep the rooting medium damp but not waterlogged, and pour out any water that gathers at the bag base.
- The cutting should take root after two to four weeks, depending on the species and growing conditions. Gradually expose the rooted cutting to more fresh air by opening the bag a little each day.
- Once the roots are fully established (you’ll feel slight resistance when gently tugging at the cutting) and the bag is completely off, you can transplant the cutting to a species-appropriate potting soil and place it in the spot you plan for it to call home.
Propagating in water
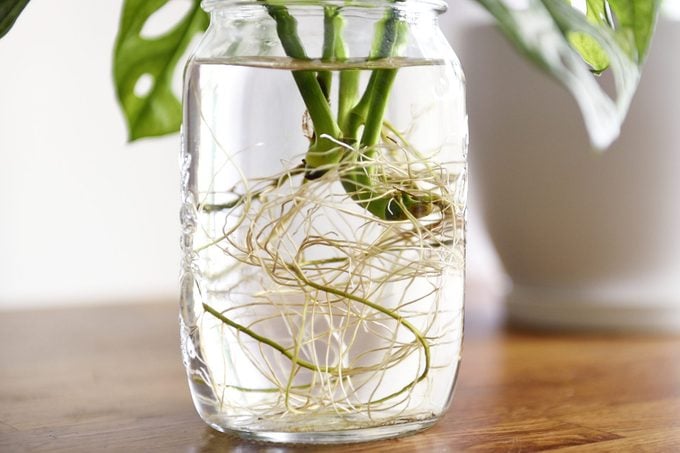
When possible, water propagation is master gardener Beth Buckley’s go-to method. “I like it because it’s easy and doesn’t require any special knowledge or tools—cut your [plants], plop them in a jar or cup of water, set them somewhere they will get some light and wait for roots,” she says.
What you’ll need
- Sharp, clean knife, scissors or pruning shears
- Gloves (optional)
- Rooting hormone (optional)
- Narrow-topped clear glass jar (too wide and the entire stem will submerge in water)
How to propagate in water
- Wash your hands thoroughly or put on gardening gloves. Using sterile scissors, shears or a knife, cleanly cut off a healthy 4- to 6-inch stem from new growth, making sure the base contains a healthy node.
- Remove up to two-thirds of the leaves at the stem’s base, leaving only a few leaves on the upper part of the cutting.
- Get rid of any flowers, buds or fruit.
- Dip the cut base into rooting hormone, if desired.
- Fill the jar with water—but not so high that any leaves get wet. Tap water is fine, but make sure it’s room temperature; too cold, and it could send the cutting into shock.
- Place the cutting where it will receive bright but indirect light.
- Change the water every week.
- If black slime develops on the base of the roots, cut it off. Once the slime has progressed to the stem, root rot has set in and you will probably have to take a new cutting.
- Wait for the roots to grow to around 2 or 3 inches long, then transfer the cutting to a small container with drainage holes and porous potting soil.
- Put a clear plastic bag over the new plant. “One potential issue with water propagation, though, is that when you first transplant the rooted cuttings to soil, they are especially sensitive to drying out,” Buckley says. The bag will help maintain a higher humidity level.
- Keep the soil moist but not waterlogged the first week or two after transplanting. After that, standard plant-watering guidelines apply.
Propagation mistakes to avoid
When learning how to propagate, newbie gardeners may have a few hiccups. That’s only natural. But you can give yourself a leg up by avoiding these plant propagation no-nos:
- Overdoing it with rooting hormone. Satch explains that rooting hormone isn’t necessary for houseplants, but for some species, it may help. “Less is more, as too much rooting hormone will overdose the propagation and kill the cutting,” he says.
- Taking cuttings at the wrong time of year. “Generally speaking, it’s much easier and faster to propagate plants in the spring and summer, when temperatures are warmer, days are longer and the humidity is higher. However, if you use grow lights indoors, it’s possible to propagate all year round,” says Buckley. “A heat mat or even an electric blanket set on low under your plants can be really helpful to boost root growth too. Darkness and wet, cold substrate will kill your plants in a hurry.”
- Taking too long to put the cutting into water or rooting medium. You can store a cutting in the refrigerator for up to a week if it’s wrapped in a damp paper towel and placed in a plastic bag. But left out in the elements, it will dry out quickly.
- Using unsanitary tools. Dirty shears or hands can spread pathogens that kill off delicate cuttings.
- Potting in garden soil. This doesn’t always provide the drainage the cutting needs to root, and it can harbor nasty pathogens.
- Providing too much sun exposure. This damages delicate cuttings. Light is essential for root formation, but make sure it’s bright but indirect.
Now that you’re a master of propagating plants, fill your space with gorgeous greenery (we love ZZ plants and fiddle leaf figs) and multipurpose plants, like medicinal herbs and air-purifying plants.
Sources:
- Christopher Satch, horticulturist and professor with the New York Botanical Garden
- Beth Buckley, master gardener
Originally Published: December 06, 2022