


I Canceled My Nail Appointments After Trying This At-Home Mani System

Updated: Jul. 18, 2024

Olive & June promises salon-quality manicures at home. And let me tell you: It delivers.
Our editors and experts handpick every product we feature. We may earn a commission from your purchases.Learn more.
I have a confession: I’m really bad at caring for my nails. Maybe it’s the lack of time (read: dedication) for at-home nail care or my anxious nail-picking habit.
Despite my best efforts, I somehow find myself back in that salon chair every month. I mean, I can’t have my nails looking totally awful, right? But even my attempts with press-on nails can’t quite mimic that glossy, professional look.
In search of a solution for keeping my nails in tip-top shape on a budget, I decided to give Olive and June’s mani system a go. Based on all the Olive and June reviews I read, everyone swears by it. It’s complete with a cuticle serum, touch-up brush and even a special tool for easy painting with your non-dominant hand. But can it deliver on salon-worthy manicures? Here’s my Olive and June review.
What’s the Olive and June Mani System?

Olive & June began producing nail polish in 2013, but it wasn’t until the brand released its polish bottle handle, The Poppy, that it really revolutionized the at-home manicure. We all know one of the biggest hurdles of the at-home manicure is painting with your non-dominant hand. Polish ends up everywhere, making your masterpiece look like a child’s coloring book at best. But with the little grippy tool, The Poppy? All of this changed. Finally, it offered a way to paint your nails just like a professional manicurist!
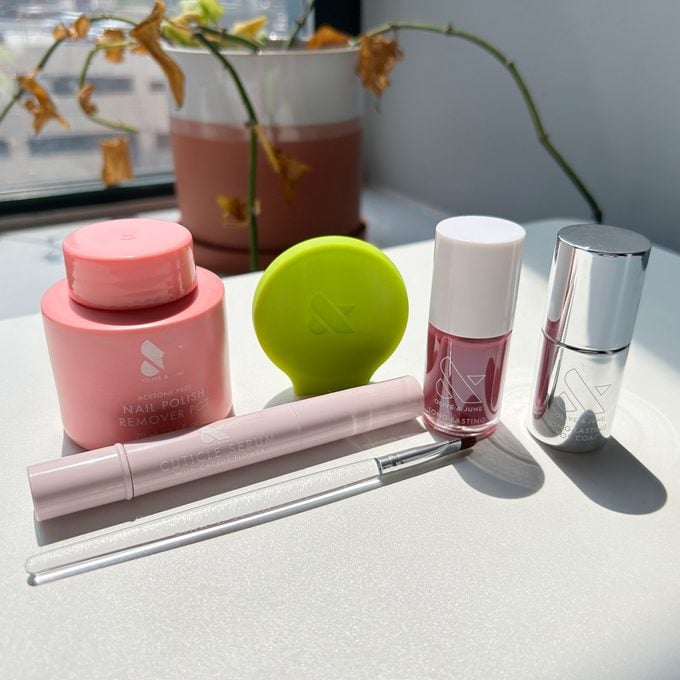
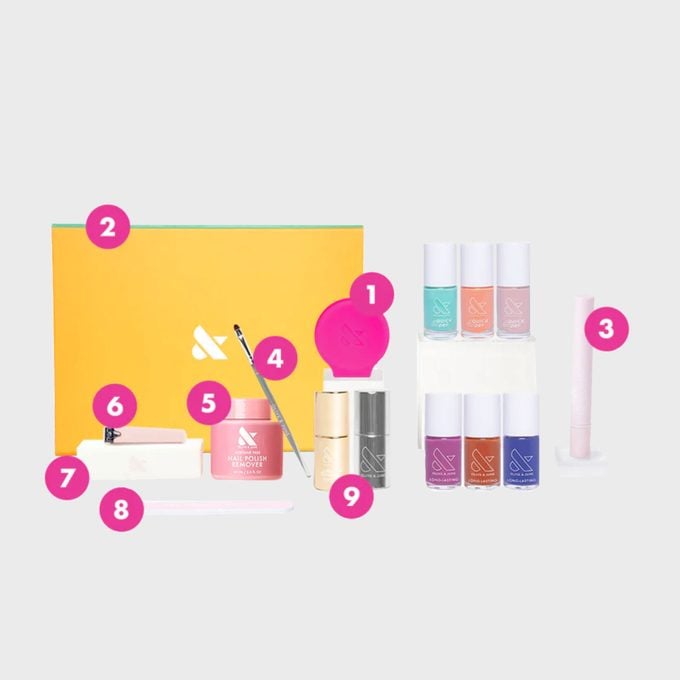
Okay, back to the mani system. The set also contains:
- Cuticle serum
- Touch-up brush
- Polish remover pot
- Nail clipper
- Nail buffer
- Nail file
- Top coat
- Choice of polish
- And a pretty pink box to store everything inside
And while The Poppy is undoubtedly the star of the show, each of the other items offers some innovation. For example, the touch-up brush’s angle is designed to tidy nail edges with precision, and the polish remover pot swipes away old color with a dip of your fingertips—no fussy cotton balls necessary. Bonus: The non-toxic polish is “15-free,” meaning it contains nothing from the long list of harmful ingredients found in common nail polishes (think formaldehyde).
Sure, these nail products seem impressive. But we all know it really comes down to whether the actual process can achieve salon-worthy manis. Olive & June even takes that to the next level, offering one-on-one virtual appointments with trained staff, so you can learn painting techniques and the best ways to care for your nails.

I Tried It
Olive and June Mani System
Not only has Olive and June's mani system helped me kick my nail-picking habit, I'm shocked by the precision of my at-home mani.
How we tested it
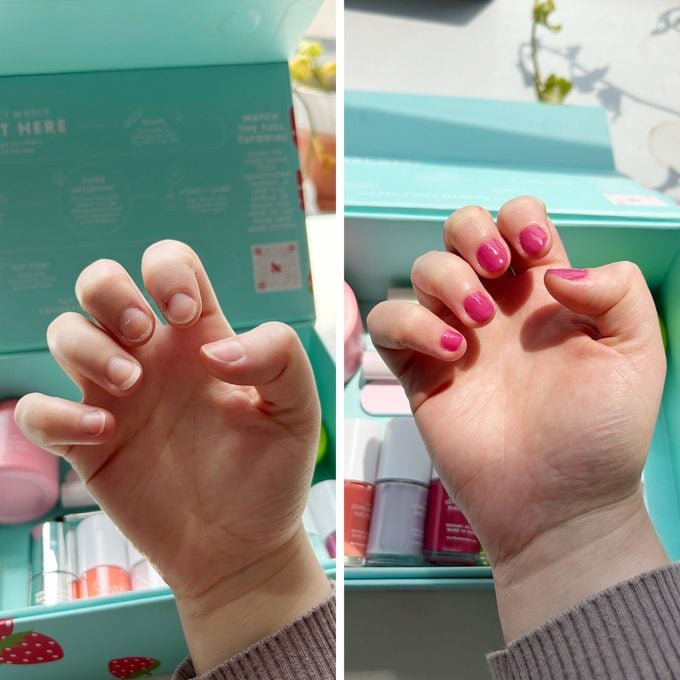
I received my Olive and June mani system in a beautiful blue box with strawberries all over the front. I was thrilled to discover all the mani goodies inside, including six bright nail polish colors. When you order, you choose between two polish types: quick-dry and long-lasting. As the latter delivers the gel manicure results I covet, I had to give it a try. I wondered, “How well will Olive and June’s long-lasting polish really hold up against professional gel manicures?”
Step 1: Prep
The first and most important step, according to Olive & June, is the prep. Luckily, the mani box notes all of the steps for the perfect at-home manicure: Shape (trim and file), prep (buff and push cuticles back), clean (by dipping nails in the polish-remover pot) and paint. I know, I know: Dip nails in the polish-remover pot and then paint? I did a double-take when I saw this step and read it over and over again to ensure I was reading it right. Apparently, using polish remover before painting rids nails of any natural oils and helps the paint “stick” to the nail better. How interesting!
The prep process also taught me that shaping nails is 90% trimming with clippers and 10% filing. This was certainly news to me, but after cutting my nails to the length I wanted them and filing the rough edges, it made sense. So. Much. Easier!
I was surprised to see the mani system didn’t include a tool to push back or trim cuticles. Surprisingly, Olive & June doesn’t recommend trimming cuticles at home as it can lead to injury and infection if you cut too close. I read up on the brand’s recommended cuticle care and learned that the kit doesn’t include a tool for pushing back cuticles because you can do it just as good with your thumbnail. I did just that, then buffed off the dead skin that accumulated near the cuticle.
Step 2: Paint
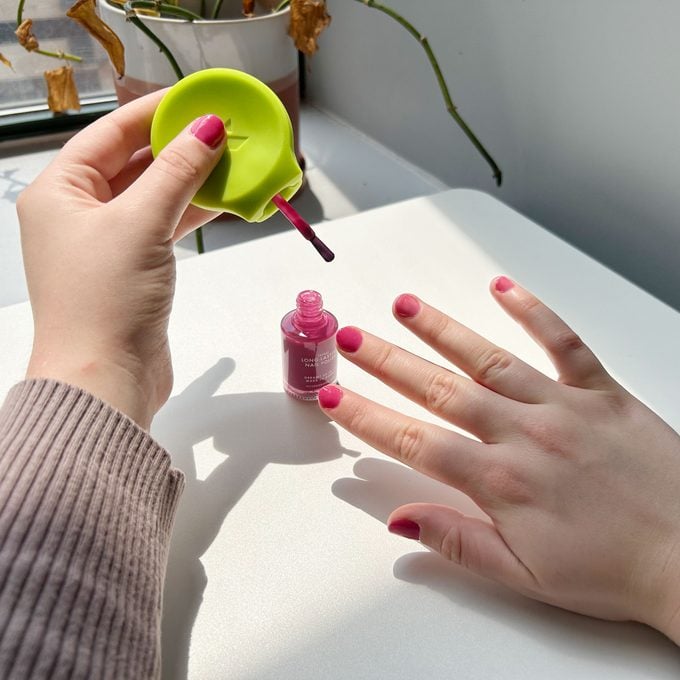
Time for the fun part: painting. I turned to the brand’s Mani 101 guide to nail (pun intended) this step. This is where The Poppy comes in handy. It’s a circular, squishy tool that fits on the polish bottle, offering a much surer grip for painting with your non-dominant hand. You remove the top of the polish bottle, stick on The Poppy, twist open the bottle and start painting.
I’m not exaggerating when I say painting nails with The Poppy is a total game changer. The precision and control I found I had while painting was unreal, and I was able to get the paint exactly where I wanted it without ending up with a big mess. As for the final look? Amazing shine! The long-lasting polish successfully achieves the glossy look of a professional gel manicure. I was so proud of my at-home mani, I couldn’t stop talking about it for days after.
Step 3: Maintain
To see how long-lasting Olive & June’s nail polish truly is, I watched for signs the polish was wearing or chipping. I cook a lot, resulting in piles of dishes every single night. Much to my delight, the polish didn’t chip on day one, nor on day two. Day three, however, I started to notice my nails growing out from the polish. No major chipping, but it seemed time for another coat of polish and sealing it with the top coat.
That’s the thing: To make your manicure last longer with Olive & June, it’s all about the care after the initial mani. The brand recommends hydrating cuticles with the serum three times per day, and reapplying the top coat every two to three days for longevity.
I followed these exact steps for one week after my initial mani, making sure to use the cuticle serum daily and sealing it all with a fresh top coat when my nails needed an extra shine. It wasn’t until day seven that my nails started to chip. And honestly, that’s way better than any at-home mani I’ve attempted.
One last thing: It’s also recommended to hold off on long hot showers (you know, the hair-wash-and-shave showers) the day of and the day directly after your mani. I mean, you don’t want the water and steam destroying all the hard work you put in!
Pros
- Includes all of the tools for perfecting your painting technique and caring for nails
- Comes with the polish of your choice, and the long-lasting polish is just like salon gel polish
- The Poppy tool makes it so much easier to paint with your non-dominant hand
- Travel-friendly, easy-to-use cuticle serum makes you want to apply it all day, every day
- Everything stores neatly inside the box it arrives in
Cons
- Mani system doesn’t come with the nail strengthener (which, in my humble opinion, would help a lot)
- Should reapply the top coat every few days for best results and apply cuticle serum three times a day, which can be time-consuming
What other shoppers had to say
While I swear the Olive & June has revolutionized the at-home mani, you don’t have to just take my word for it. Here’s what a handful of the more than 9,000 enthusiastic reviewers on the Olive & June site have to say about the mani system:
Final verdict
Though I love the occasional salon manicure for special events, I can no longer justify hitting up the salon every two weeks. Not only has Olive and June’s mani system helped me kick my nail-picking habit, I’m shocked by the precision of my at-home mani. Polish no longer gets all over my hands, and my cuticles don’t look disheveled. I treat myself to a little self-care evening about once a week, where I put on my favorite TV show and sit down with my Olive & June box to touch up or redo my nails. It’s so satisfying to be able to spruce up my nails like a pro all on my own!
Where to buy the Olive and June Mani System
Find Olive and June’s complete mani system on the brand’s website where it goes for $55 to $85, depending on how many polish colors you include in your order. I don’t need to do the math for you—anyone who gets frequent gel manicures know that’s the cost of one or two appointments. Now, you’ll enjoy salon-worthy manicures on your own schedule and in the comfort of your own home—for a fraction of the cost. Talk about a win-win-win!
I Tried It
Olive and June Mani System
Not only has Olive and June's mani system helped me kick my nail-picking habit, I'm shocked by the precision of my at-home mani.
Why you should trust us
Madi Koetting is a pioneer of Reader’s Digest‘s social media shopping team, overseeing social commerce strategy and film product reviews. She is also a founding member of the Reader’s Digest shopping team, where she has reviewed 100s of products across the home, style and beauty verticals. Madi is an expert on “internet-made-me-buy-it” finds, including the Olive & June Mani System. She has over five years of experience and has also contributed to publications like Everygirl and Stylecaster. You can catch Madi’s current work on Readers Digest, Taste of Home and Family Handyman.
FAQs
Is the Olive and June system worth it?
If you enjoy painting your nails at home or get frequent salon manicures, the Olive and June mani system is 100% worth it. It’s stocked with everything needed for healthy nails, plus the tools for smooth polish application and upkeep. The non-toxic polishes are the cherry on top. It’s a well worth it upgrade from standard drug store nail care.
Does Olive and June Manicures last?
When Olive and June polish is applied as recommended, it can last up to five or more days without chipping. Following the brand’s tips and tricks is key to making it last longer, like proper prep and re-applying the top coat every two days.
How do you keep Olive and June Nail Polishes from chipping?
Before the actual polish, prepping nails is oh-so-important. Trimming, filing and buffing nails are part of this, but it’s essential to dip nails in the remover pot right before painting to remove any oils that could make the polish less likely to stick. Lastly, you should seal polish with the top coat after polish has dried, and then every two or three days following.
Originally Published: May 31, 2023