

How to Make Your Blowout Last for 5 Days: A Step-by-Step Guide

Updated: Dec. 16, 2022
Pro-approved tips to execute the perfect blowout—and keep it looking fabulous for five full days!
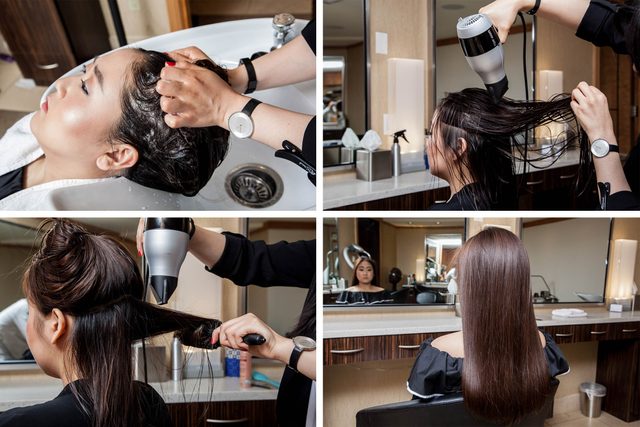
Day 1: Bouncy blowout
It’s time to set your locks up for success for the rest of the week. We got Jean Oh, a stylist at Nunzio Saviano Salon in New York, to show us how it’s done.
1. Double shampoo
Clean hair is the foundation of a long-lasting blowout. Shampoo, rinse, and repeat. This will guarantee that you’ve removed all product buildup, dirt, and oil. Remember, not all formulas are the same. Be sure to find the right shampoo for your hair type.
2. Condition the ends
Think conditioner weighs down your hair? You’re probably A) not using the right formula for your texture, or B) you’re not applying it properly—meaning you’re slathering it all over. The trick is to find a formula that’s made for your specific hair type—(if you have fine hair, try a volumizing formula, like Aveda Pure Abundance Volumizing Clay Conditioner or Aussie Aussome Volume Conditioner. Coarse strands? Amp up the nourishment with Wella Enrich Moisturizing Conditioner for Coarse Hair or Nexxus Humectress Moisture Restoring Conditioner)—and concentrate on the ends only.
3. Prep and protect
Opt for a multipurpose product that guards against heat, defends against humidity, and extends the longevity of your blowout.
4. Rough dry
Grab a pro-approved hair dryer and rough dry hair 80 percent before styling with a round brush.
5. Section strands
Divide hair into small sections, starting at the nape of your neck. Sections should be no larger than your brush. Dry each section individually until 100 percent dry.
6. Set your blowout
Use the cool setting on your blow-dryer to close the cuticle and set your style. Hot tip: We love a fresh blowout as much as anyone, but while caressing your silky strands may feel great in the moment, it can make it look greasy—so do yourself a favor and resist the urge.
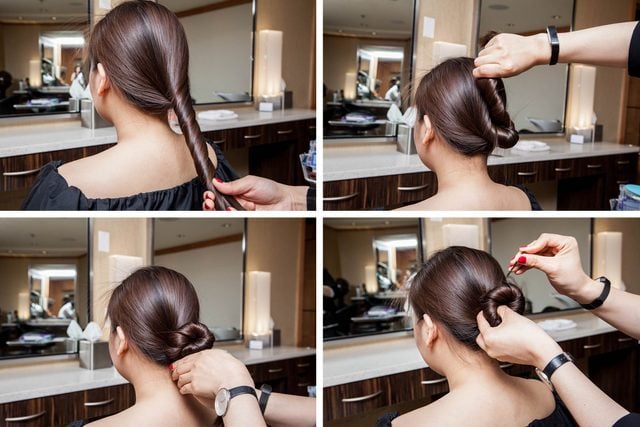
Day 1: Overnight
When it comes to preserving your ‘do, how you sleep—and what you sleep on—is key. (Be sure to avoid these nighttime habits that ruin your hair.) Before bed, tilt your head down, and twist all hair up into a loose bun or ponytail; secure with a few bobby pins (you’ll style your hair this same way before every night). Stylists swear by silk pillowcases, which reduce friction to keep tresses smooth and tangle-free.
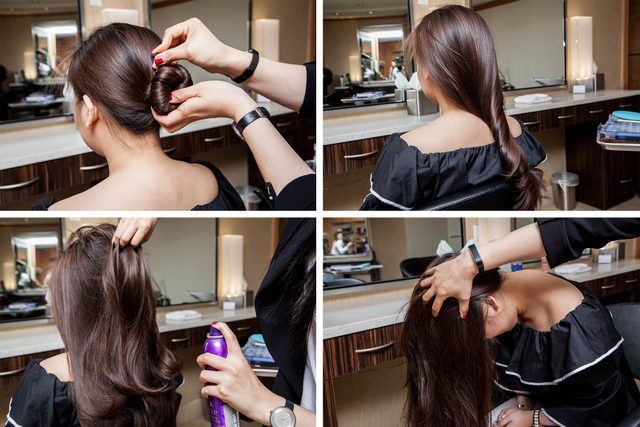
Day 2: Laid-back volume
Your blowout should still be in prime condition on day two, so you won’t need to do too much to make it look great.
1. Undo nighttime ‘do
When you wake up, release your pin-set bun or pony from the night before.
2. Dry shampoo
Revive strands a few strategic spritzes of dry shampoo, like Oribe Gold Lust Dry Shampoo. Be sure to hold the canister at least five inches away from your roots and use your fingers to rub your scalp as you apply.
3. Flip and go
Flip your head upside down and give strands a good shake. This will give you instant volume. Voila, you’re ready to go!
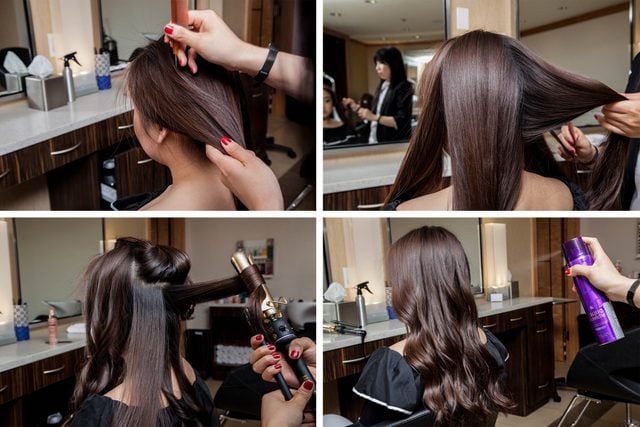
Day 3: Loose waves
“Your hair may have lost all the movement, but don’t worry,” says Bricel Cury, Lead Stylist at DreamDry. Waves will camouflage grease and give locks some life.
1. Dry shampoo (optional)
If your hair is feeling a bit limp, awaken roots with a spritz of dry shampoo.
2. Section strands
Using a fine tooth comb, separate your hair into four large, triangular sections. Start by parting your hair down the middle, then from the crown of your head to the top of your right ear, repeating on the left. Twist each section into a ponytail and secure with a clip.
3. Curl locks
Work in sections, starting on the left. Remove the hair clip and start sub-sectioning strands. (The thickness of your hair will determine the size of the sections; finer hair will have fewer, while thicker hair will require more.) Use a large, two- to three-inch barrel curling iron to create some waves throughout your hair. When curling, be sure to curl the sides away from your face and leave an inch of hair out of the iron, so the very ends of your hair are straight for a more natural look. When you’ve completed all sections, run your hands through your hair and break apart the curl. No curling iron? No problem! Try these tricks to curl your hair without a curling iron.
4. Spritz hairspray (optional)
If you tresses are prone to frizz and flyaways, give them a spritz of flexible hold hairspray, like Garnier Fructis Style Flexible Control Hairspray.
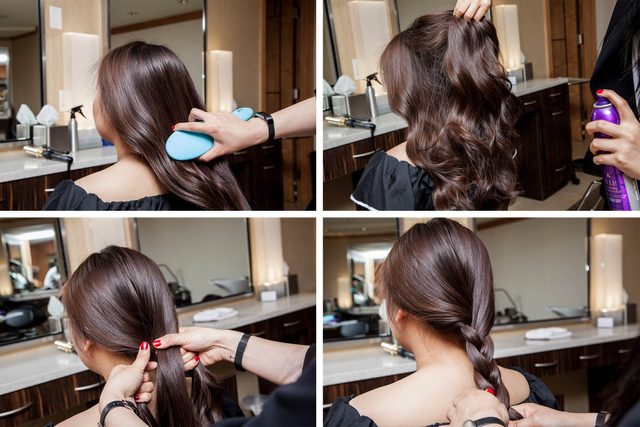
Day 4: Braid
A pretty plait is a perfect idea for day four. Added bonus: Not heat styling tools required!
1. Detangle
After a few days of not washing your hair, you might find a few knots. Detangle tresses with a fine tooth comb or brush. This will make the whole styling process easier. Here’s how to find the best hair brush for your type.
2. Texturize tresses
Hair that has a bit of grip is best for braids. By day four your tresses should fit that description. If you want to amp up the texture, hit your strands with a spray like amika Un.Done Texture Spray or Ouai Texturizing Hair Spray.
3. Braid it
A simple three-strand braid is a breeze. Start by splitting hair into three sections (A, B, and C). Cross the left strand (A) over the middle (B); then the right strand (C) over the new middle (A). Continue this pattern. Once you’ve braided to your desired length, simply secure with a hair elastic. Pro tip: Pick an elastic that’s the same hue as your hair color. If you’re already a plait pro, try your hand at a fishtail braid or Dutch braid.
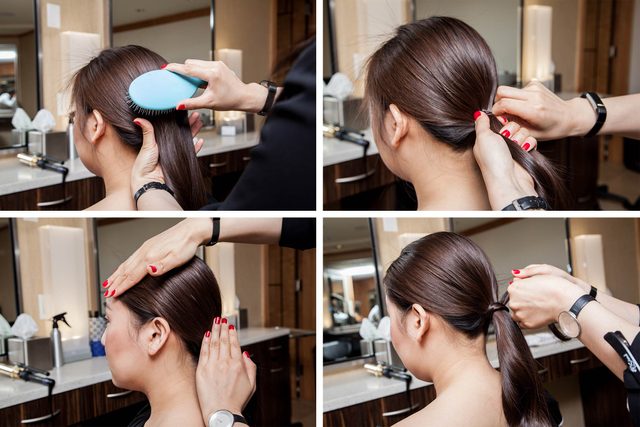
Day 5: Sleek pony
“Your last day is the day to put it up, and a ponytail is the way to go,” says George Kyriakos, celebrity stylist and founder of Stylebookings.
1. Brush it back
Brushing (or combing) strands in the direction of your pony will do more than just help eliminate knots, it’ll curb bumps and flyaways.
2. Secure strands
Once you have your pony at the desired smoothness and height, secure it with a non-rubber hair elastic.
3. Apply smoothing cream (optional)
If you have any frizz or flyaways apply a dime-sized amount of smoothing cream or serum.
4. Wrap it up
To give your ‘do a polished finish, try a “wrap pony.” Grab a ½-inch slice of hair from the bottom of your pony, hit it with hairspray, wrap it all the way around the elastic, and pin it underneath.
Originally Published: September 01, 2017