


How to Clean a Faucet Head to Get Rid of Buildup, According to the Pros


Updated: May 22, 2024
These tips from the experts make it easy to clean your faucet head so it looks brand new—and works better too!
Whether in the kitchen or the bathroom (or anywhere else, really!), buildup on faucet heads can lead to low flow and eventual bacterial growth—neither of which is desirable. For a pro-approved process for getting rid of the gunk, I called on my nearly 15 years of experience as an editor covering cleaning content. I pulled out my Rolodex and reached out to a top-tier faucet company along with a pair of professional cleaners to get their insight into how to clean a faucet head.
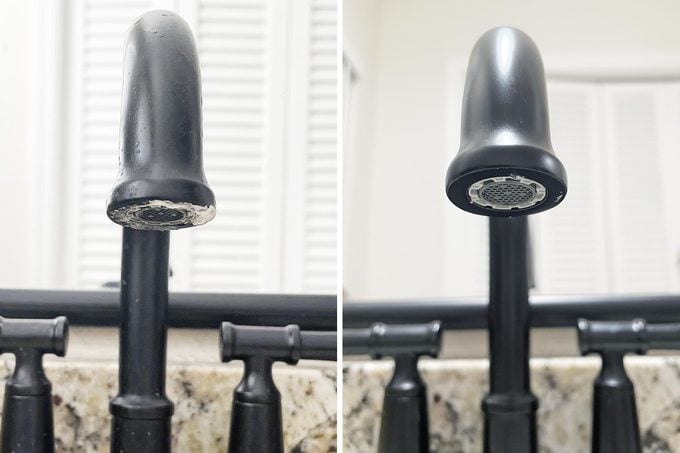
I live in a home that is over 50 years old and inherited some serious mineral deposits on the faucet heads. Plus, we’ve got hard water. So even the new fixtures we installed after moving in have developed an impressive amount of grime. I put my experts’ tips to the test to determine how to clean those fixtures once and for all. Bonus: You can employ these methods to clean your showerhead as well.
Get Reader’s Digest’s Read Up newsletter for more cleaning, humor, travel, tech and fun facts all week long.
About the experts
|
How to clean a faucet head
Faucets are prone to developing a mineral buildup around the rim and can get gummed up with other debris, like toothpaste or sediment from the water that flows through them. “The key to cleaning is doing it regularly,” says Gary Schopp, the knowledge manager at Delta Faucet Company. “Start gentle, and escalate only if needed.”
All the experts I talked to agreed that distilled white vinegar should be the main ingredient you reach for when cleaning a faucet head. Cleaning expert Tendy Takaidza explains that the acidity of raw lemon juice and grocery store apple cider vinegar are about the same as that of white vinegar, so any of these ingredients could work in a pinch.
Wondering what not to use? Schopp warns that industrial, abrasive or bleach-based cleaners should be avoided. He also says to “avoid products that state on the label that they remove tarnish and rust, along with those containing hydrofluoric, hydrochloric and/or phosphoric acids or other caustic agents.”
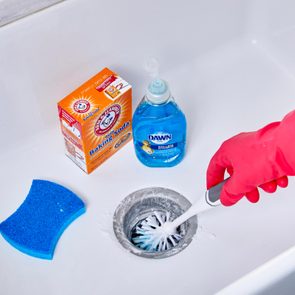
Supplies you’ll need
- Rubber jar opener pad (optional)
- Water
- Distilled white vinegar
- Bowl or zip-top bag
- Clip or rubber band
- Soft-bristle brush (like an old toothbrush) or nonabrasive sponge (like Scrub Daddy)
- Microfiber cloth
Step 1: Break off buildup
For a spray wand (like on a kitchen sink or showerhead), Schopp says to “periodically rub your thumb over the nozzles to break off any buildup” that may be hindering the water flow. Knocking loose larger buildup will allow the cleaning solution to focus on the more stubborn sediment.
Step 2: Remove the faucet head (if you can)
If you have a spray wand with a removable head, detaching it can make cleaning easier. (If your faucet head does not come off, move on to Step 3.)
Here’s how to remove the faucet head:
- Extend the spray hose from the faucet.
- Put a clip on the hose to prevent it from retracting.
- Unscrew the faucet head.
This should not require tools. Schopp suggests using a rubber jar opener pad to get a better grip if you’re having trouble.
Step 3: Make your cleaner
Mix a one-to-one solution of water (any temperature) and distilled white vinegar. If you removed your faucet head, place it in a cup or bowl and add just enough solution to cover the underside of the faucet head, where the water comes out.
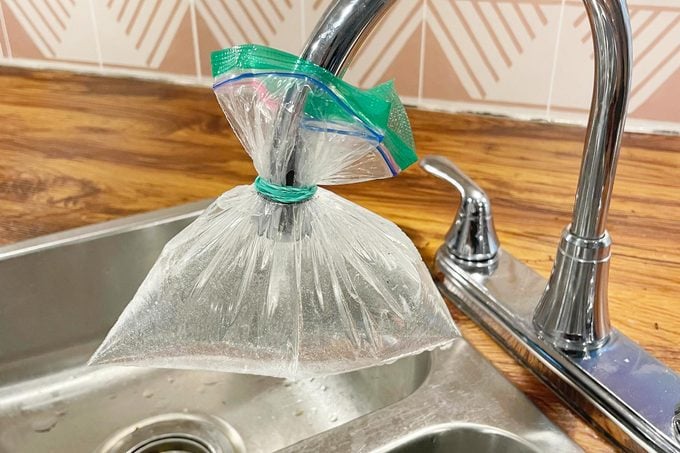
If your faucet is stationary, Takaidza has an easy cleaning tip: Add about 2 tablespoons of your solution to a zip-top bag and attach it to the faucet head with a rubber band or clip. Again, aim to cover the underside of the faucet head with the solution.
| ♦ Pro tip |
| In my tests, I found a binder clip to be most effective in keeping the bag of solution on my sink faucets, while a sturdy rubber band worked best on my larger showerhead. |
Step 4: Let soak
Let the solution sit for at least 30 minutes. Dealing with particularly tough buildup? Let it soak overnight, says Brandon Pleshek, a third-generation janitor who offers up TikTok cleaning hacks and useful advice on his Clean That Up website and YouTube channel.
I tested this method on three sink faucets and one showerhead. I soaked the kitchen faucet and showerhead for about an hour and a half, while my particularly challenging kids’ bathroom faucet took more than two hours.
Step 5: Scrub the faucet head
Check your faucet head every 30 minutes or so, if you can, using a toothbrush or nonabrasive sponge to scrub the surface and knock loose additional sediment.
Cleaning your showerheads too? Takaidza notes that the nooks and crannies can get clogged up, so she suggests gently using a toothpick along with your brush to open up the holes.
Step 6: Repeat, if needed
If the buildup is particularly heavy, continue soaking the faucet head in the vinegar solution.
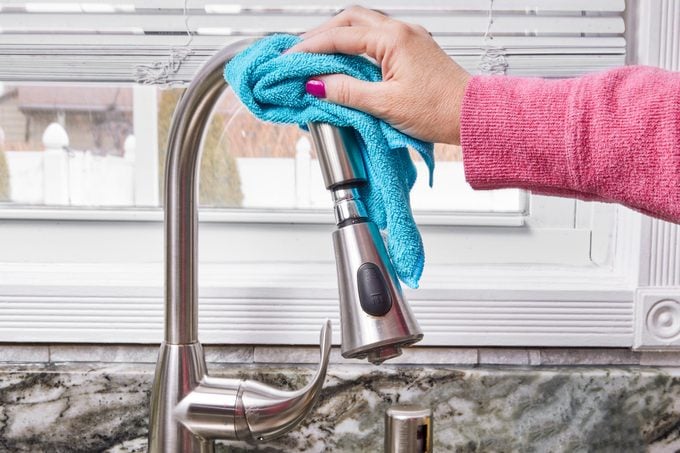
Step 7: Rinse and reassemble

Some folks choose to use baking soda for extra scrubbing power, but the vinegar soak should do the trick, so you just have to remove the faucet head from the bowl or bag and rinse it with water. Wipe it clean with a microfiber cloth. If you’ve removed the head, reattach it to the hose.
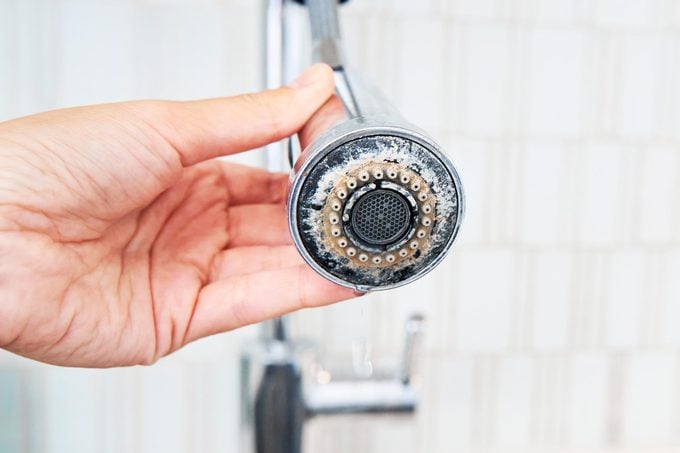
How to clean a clogged faucet aerator
Once you’ve learned how to clean a faucet head, it’s time to turn your attention to the faucet’s aerator, something most of us aren’t cleaning nearly enough. Though you may not be able to recognize one, you’ve no doubt come into contact with a faucet aerator at some point. It’s the round portion at the end of a faucet head that’s covered with a mesh screen.
“An aerator’s primary purpose is to direct the flow of water out of the spout so that it doesn’t splash,” explains Schopp. “Many aerators also regulate the amount of flow out of the spout.”
If you are like me and have never removed an aerator from your faucet head, you might be in for a surprise. I disassembled my kitchen’s gooseneck faucet to discover that the aerator was clogged with rich black sediment. The debris easily washed away, and now the faucet has a much stronger flow for dishwashing.
Need another reason to clean your aerator today? According to the Centers for Disease Control and Prevention, cleaning faucet aerators can prevent germs from growing in the faucet.
Supplies you’ll need
- Dish towel
- Rubber jar opener pad, strap wrench, pliers wrapped in electrical tape or the aerator tool that came with your faucet if it has a hidden (cache) aerator
- Bowl or cup
- Water
- Distilled white vinegar
- Soft-bristle brush (like an old toothbrush)
Step 1: Remove the aerator

First things first: Locate your faucet’s aerator. “A standard aerator extends from the end of the spout,” explains Schopp. Can’t seem to locate this slight extension of your faucet? You may have a cache aerator, which hides up in the spout and leaves the end of the spout flat.
Next, line your sink with a dish towel to cover the drain and prevent any pieces from accidentally dropping down it. Then unscrew the aerator. “[It] can be removed by hand or assisted with a rubber jar gripper or strap wrench,” Schopp says. Typically, it’s “lefty loosey,” but he reminds us that you’ll be working from above the spout, so you’ll actually turn to the right to loosen.
If you’ve got a cache aerator, your faucet will have come with a toothed tool to remove it.
No matter what type of aerator you’re dealing with, use caution when removing this small element of your faucet so as not to alter its shape. If you do, it won’t fit back into position after cleaning.
Step 2: Clean the aerator
In a cup or bowl, create a homemade cleaner out of one part distilled white vinegar and one part water. Make enough of the solution to cover the pieces. Let it soak for 30 minutes, scrubbing with a toothbrush periodically to remove debris.
Step 3: Repeat as needed
Repeat the process if you’re dealing with particularly heavy buildup.
Step 4: Rinse and reassemble
Rinse the aerator with clean water and reattach it to your faucet head.
| ♦ Pro tip |
| If you cannot remove the aerator, Schopp suggests soaking a rag in the vinegar mixture, wrapping it around the end of the spout and attaching it with a rubber band. Make sure the rag has good contact with the aerator and let it sit for about 30 minutes. Follow with a toothbrush cleaning to knock away as much debris as possible. Rinse by dipping the faucet head in a cup of clean water. |
FAQs
How often should you clean a faucet head?
“It’s important not to let soap, scale, hairspray or other environmental elements build up,” says Schopp. He recommends wiping down the bathroom sink after you brush and floss and the kitchen sink after finishing up the day’s dishes.
While the recommended frequency of cleaning depends on the type of water you have (folks with hard water will need to clean theirs more often, says Pleshek), following the above cleaning method monthly will help keep your faucet running smoothly. Once you get on a regular cleaning schedule, you won’t have to leave the solution on the faucet for quite as long.
How do you clean the rest of the faucet?
Pleshek recommends Bar Keepers Friend soft cleanser and a Scrub Daddy nonscratch scrub sponge to clean the rest of the faucet. Apply the cleaning solution to the surface, let it sit for a minute, then rinse. Buff dry with a microfiber towel.
What’s the best way to remove hard-water stains on faucets?
The same vinegar-and-water solution you used on your faucet heads will remove hard-water stains from your faucets. “It is not only effective but universally safe for the faucet finish or components,” says Schopp.
If the hard-water spots prove to be particularly stubborn, he recommends Bar Keepers Friend foaming spray cleaner, Formula 409 Antibacterial All-Purpose Cleaner, Fantastik All Purpose Cleaner or Windex Original Glass Cleaner.
Why trust us
At Reader’s Digest, we’re committed to producing high-quality content by writers with expertise and experience in their field, in consultation with relevant, qualified experts. For this piece, Stephanie Sisco tapped her experience as a longtime home and cleaning editor. Then Ann Russell, TikTok’s “cleaning auntie” and the author of How to Clean Everything, gave it a rigorous review to ensure that all information is accurate and offers the best possible advice to readers. For this piece, we relied on reputable primary sources, including cleaning and faucet experts and reputable organizations. We verified all facts and data and backed them with credible sourcing, and we will revisit them over time to ensure they remain accurate and up to date. Read more about our team, our contributors and our editorial policies.
Sources:
- Brandon Pleshek, third-generation janitor and creator of Clean That Up; email interview, Jan. 18, 2024
- Gary Schopp, customer-solutions expert and knowledge manager at Delta Faucet Company; email interview, Jan. 23, 2024
- Tendy Takaidza, former housekeeper and founder of The Clean Loft YouTube channel; phone interview, Jan. 11, 2024
- CDC: “Preventing Waterborne Germs at Home”

Originally Published: February 01, 2024