


How to Clean a Kitchen Sink in 5 Super Simple Steps

Updated: Apr. 09, 2024
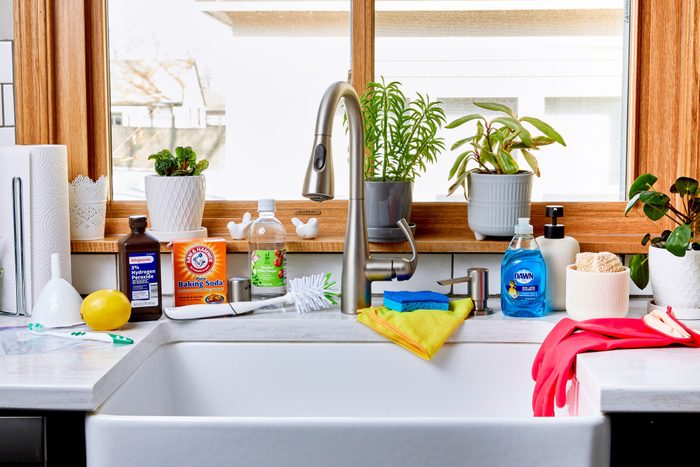
It pays to regularly clean your kitchen sink—aka the germiest place in your pad
Kitchens are havens for a buildup of daily grease and grime, so even if you’re not a germaphobe, it pays to adopt a regular cleaning schedule. But when you’re cleaning kitchens, it isn’t enough to just slosh things down with soap and a sponge. Knowing how to clean kitchen cabinets and countertops is important. But it should be your top priority to learn how to clean a kitchen sink and disinfect it.
This dishwashing and food-prepping place is the germiest locale in the entire home. Get this: It beats even the toilet bowl to the top spot.
You might wonder how to clean a stainless steel sink and whether it’s OK to use the same sprays you have on hand for cleaning your bathroom or stovetop? Follow these expert tips to keep your kitchen sink scratch-free, sparkling and sanitary, no matter which material it’s made from.
Get Reader’s Digest’s Read Up newsletter for more cleaning, humor, travel, tech and fun facts all week long.
Why should you clean your kitchen sink?
It’s no wonder studies show kitchen sinks (and their sponges) beat the bathroom for being the germiest zone in your home. Think about what you put down the drains daily.
“Germs come from a variety of places: humans, soil from produce, raw meat, our environment,” says Nicole Richard, a research associate and food safety specialist in the Food Safety Education Program at the University of Rhode Island. “Kitchen sinks could be a source of bacterial contamination, and it is a good idea to clean and sanitize them frequently to minimize the spread of germs and potential for illness.”
Don’t forget that cleaning and disinfecting aren’t the same. Cleaning gets rid of grease, food particles and dirt, and it can lift a lot of bacteria buildup. But it isn’t enough to kill off all stubborn germs, and it might spread them around further. Properly disinfecting your sink is the only way to guarantee you vanquish all viruses and bad bacteria.
How often should you clean your kitchen sink?
How often you clean your kitchen sink depends on what’s been in it, how big your household is and how risk-averse you are. But don’t wait until your drain is emitting pungent odors or you notice mold building up around the faucet.
Vera Peterson, president of Molly Maid, recommends daily cleaning. “It only takes a few minutes and can be done at the end of the day before going to bed. Cleaning out your drain weekly can also help with preventing clogs.”
You don’t have to disinfect quite so often—the chemicals are often harsher than those in cleaning products, and they aren’t as safe to handle. Overuse of certain household disinfectants (including those containing quaternary ammonium compounds) has even been associated with antibiotic resistance.
Disinfecting once a week is a good go-to. That said, daily disinfection can lower the risk of spreading disease if you’ve been washing raw meat, your sink is particularly grubby or you live with someone who is elderly, sick or immunocompromised.
How to clean a kitchen sink
A quick sponge-down and rinse might make your kitchen sink look clean, but that’s rarely enough to purge the pathogens. Thankfully, it’s possible to wipe out germs with a little elbow grease and some everyday cleaning products.
One thing to keep in mind: Instructions for how to clean a kitchen sink aren’t one-size-fits-all. The material your sink is made of will dictate which cleaners to use. In other words, knowing how to clean a porcelain sink isn’t the same thing as, say, knowing how to clean a copper sink. (Don’t worry, we’ll point you to the best supplies for the various types.)
Ready to get your sink good as new? Here’s how to clean a sink in five simple steps.
Step 1: Clear the sink

Supplies:
Directions:
You want a blank canvas before you get sucked into cleaning. Remove any dirty coffee mugs or other dishes after cleaning them, then sponge and rinse the sink to get rid of crumbs or other food debris. Now is a good time to clean your sponge holder too.
Pro tip: Dry out the sink every time you use it
Even if you’re not doing a full sink cleaning after washing dishes or rinsing veggies, grab a dry microfiber cloth and give it a quick run around the basin.
“Cleaning out the sink and then drying it really is the best way to prevent hard-water buildup and bacteria growth,” says Grace Reynolds, co-founder of the American House Cleaners Association and co-owner of Handmaid Cleaning. This is especially important for sinks with porous surfaces, like quartz.
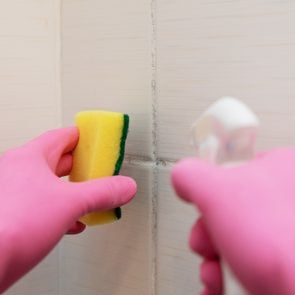
Step 2: Scrub the sink basin
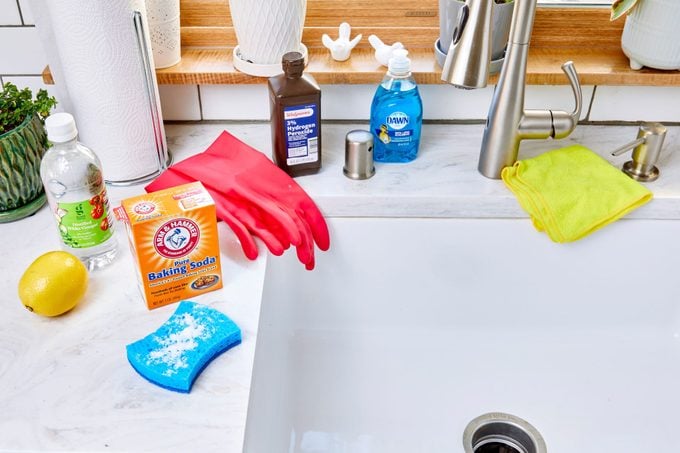
Supplies:
- Rubber gloves
- Sponge
- Microfiber cleaning cloth
- Most sinks, including stainless steel: Baking soda, vinegar, hydrogen peroxide or a lemon, and warm water
- Porous (like quartz) or copper sinks: Mild dish soap, vinegar and warm water
Directions:
With a few exceptions (more on those below), you can clean your sink with baking soda and a few other items you likely have in your pantry. “Sprinkle some baking soda onto a sponge and scrub the sink, removing any crusted-on food and bacteria. If there are some tough stains that remain, try adding drops of hydrogen peroxide or lemon juice to your sponge,” Peterson says. Or mix the baking soda with a gentle dish soap. Reynolds also recommends Bar Keepers Friend, another bleach-free, gently abrasive cleaning product, as an alternative to baking soda.
If there’s an extra-tough stain, dampen the baking soda and pour some vinegar onto the paste. Let it sit for five minutes, then scrub the stubborn stain away. If this isn’t enough, leave the paste on for up to 30 minutes.
“If you’re still struggling to get a tough stain out, cut a lemon in half and place the open side on top of the stain. Let it sit anywhere between a few minutes to a half hour, then use the lemon to scrub the area, and follow up with a damp cloth,” Peterson suggests.
Lemons are also great for porcelain enamel sinks, which can rust over time. Slice a lemon in half, sprinkle some salt on the cut surface and rub it into the rust spot until it works its magic.
If you’re wondering how to clean copper, the top tip is to avoid abrasive baking soda or Bar Keepers Friend. “They will take all the patina off the copper sink, and you’ll have a bright-yellow look,” Reynolds says. It’s best to avoid these on porous sink surfaces, like quartz, too. It can erode them over time and discolors the surface when combined with vinegar or lemon.
Regardless of your sink’s material, rinse any cleaning products off well, using warm water, and then buff and dry your sink with a microfiber cleaning cloth.
Pro tip: Steel wool and other abrasive tools are a no-no
The gentle abrasive nature of baking soda isn’t a problem for most sink types, but Peterson recommends steering clear of steel wool or pumice stones to avoid unsightly surface scratches.
Step 3: Clean and shine the faucet
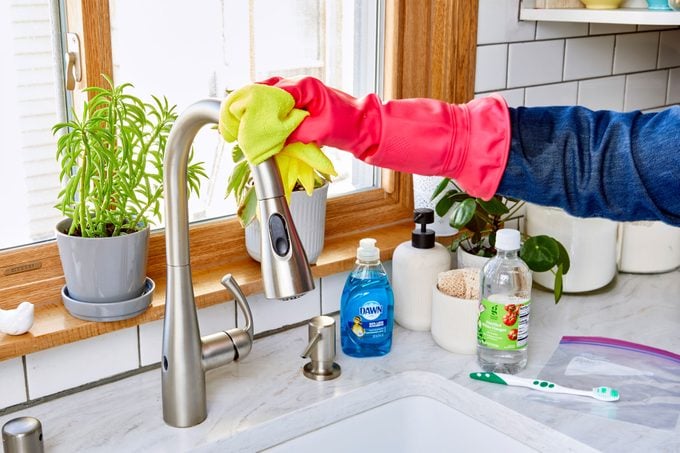
Supplies:
- Dish soap
- Quart-size plastic bag
- Vinegar
- Toothbrush
Directions:
Wipe down the faucet with dish soap and warm water to remove grease and grime. Don’t forget to clean the faucet head, as it’s a prime spot for bacterial development.
Here’s a cleaning tip for you: Once a week, fill a plastic bag halfway with vinegar or lemon juice. Fully submerge the faucet head and secure the bag with an elastic band. Leaving this around the faucet head for around an hour effectively removes hard water and calcium buildups.
Pro tip: Brush up
To get right up into the faucet head filters, use a toothbrush.
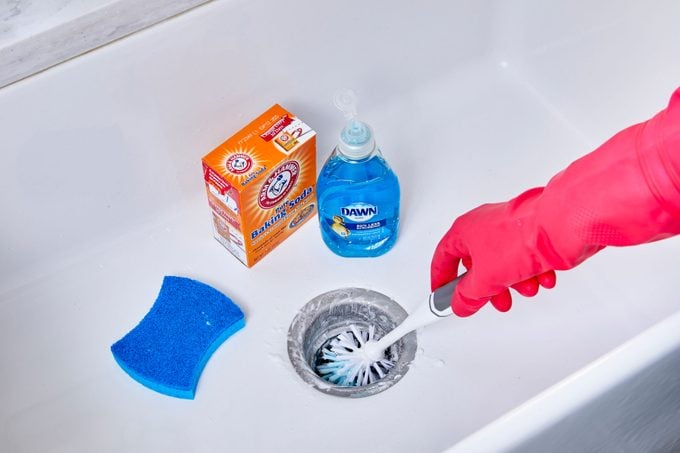
Step 4: Clean the drain
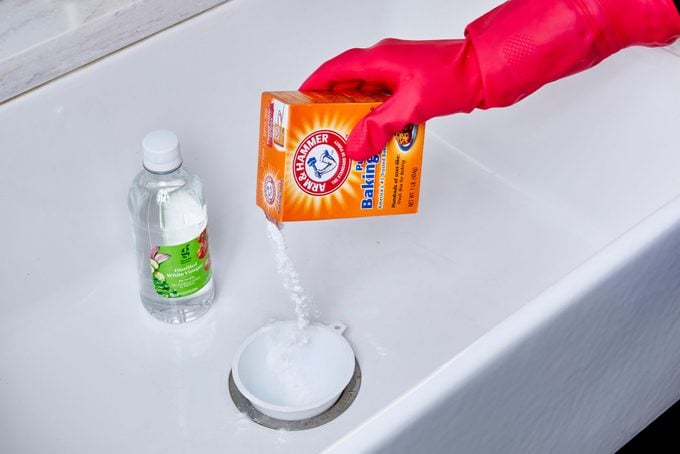
Supplies:
- Dish soap
- Baking soda
- Vinegar
- Funnel (optional)
Directions:
To remove unwanted odors and unclog a sink drain, you don’t need to use corrosive drain cleaners. Simply squirt some dish soap down the drain and then pour in a kettle full of boiling water.
Ready for step two of how to clean a sink drain? It’s fun in a science experiment sort of way: “Follow with baking soda [use a funnel if you have one] and vinegar. The mixture will fizz, and after the fizzing has subsided, wait five minutes,” Petersen recommends. “Finish by pouring more boiling water down the drain, flushing everything out.”
Pro tip: Rinse and repeat
Leave the solution to work overnight or repeat the process a few times for stubborn clogs. Heads up: Using a sink strainer helps prevent food from blocking drains.
Step 5: Clean the garbage disposal
Supplies:
- Dish soap
- Baking soda
- Bottle brush
- Sponge
- Lemon essential oil
Directions:
A mix of dish soap and baking soda is great for cleaning your garbage disposal too. But to get the blades and the underside of the rubber splash—where bacteria thrive—Reynolds recommends using a bottle brush and scrubbing sponge.
Pro tip: Don’t forget to deodorize
A few drops of lemon essential oil help deodorize, leaving your kitchen smelling fresh. Research shows that essential oils may have some antimicrobial properties, which could also help banish any remaining bacteria.
How to disinfect a kitchen sink
Supplies:
- Bleach or another EPA-approved disinfectant
- Gloves
- Sponge
Directions:
Knowing how to clean a kitchen sink is an important skill, but don’t overlook the disinfection step. Do this only after cleaning. A grimy surface means the products can’t do their job efficiently, and bacteria could linger.
Richard recommends using a diluted bleach solution to avoid sink disinfectant mistakes. “Use regular, unscented household bleach with a sodium hypochlorite concentration between 5% and 9%,” she says. “Always follow the manufacturer’s instructions for applying the bleach solution to surfaces. If instructions are not available, leave the diluted bleach solution on the surface for at least one minute before removing or wiping.”
This is known as the “contact time” for disinfection, she explains. The surface should remain visibly wet during this time.
“If using commercial disinfectants, make sure they are approved for use on your surfaces, and completely follow the manufacturer’s instructions on the label,” Richard says. The EPA has a list of approved and effective products (both natural and chemical options) if you want to avoid bleach for health, environmental or sink-material reasons. Even a diluted bleach solution can discolor your sink surface.
And that’s your reminder to always wear gloves and wash your hands thoroughly after handling disinfectant products.
Pro tip: Don’t hold on to your diluted bleach solution
Don’t make more bleach solution than you need for your daily disinfecting. “They will not be as effective after being mixed with water for over 24 hours,” Richard explains.
Sources:
- Nicole Richard, research associate and food safety specialist in the University of Rhode Island’s Food Safety Education Program
- Vera Peterson, president of Molly Maid
- Grace Reynolds, co-founder of the American House Cleaners Association and co-owner of Handmaid Cleaning
- Frontiers in Public Health: “Essential Oil Disinfectant Efficacy against SARS-CoV-2 Microbial Surrogates”
- Journal of Applied Microbiology: “Reduction of Faecal Coliform, Coliform and Heterotrophic Plate Count Bacteria in the Household Kitchen and Bathroom by Disinfection with Hypochlorite Cleaners”
- Environmental Pollution: “Biocide-Tolerance and Antibiotic-Resistance in Community Environments and Risk of Direct Transfers to Humans: Unintended Consequences of Community-Wide Surface Disinfecting during COVID-19?”
- EPA: “Selected EPA-Registered Disinfectants”

Originally Published: March 13, 2023