

How to Make a Facebook Post Shareable

Updated: Jan. 23, 2024
From casual users to the social media savvy, everyone should know these simple steps to make a Facebook post shareable
You might think you know all the ins and outs of your Facebook profile—until someone says they can’t share one of your recent posts. If you don’t already know how to make a Facebook post shareable, this comment might leave you stumped. Why waste your valuable time fruitlessly clicking around your profile page when you could spend it spreading the word about an adorable dog or delicious recipe?
Fear not! We’ve got your back. Our quick and comprehensive how-to will guide you through the process of making your Facebook posts shareable so you can reach a wider audience (and start basking in the wave of virtual high-fives from your friends and followers). For other Facebook-related tech tips, check out how to make Facebook private, how to hide friends on Facebook and how to tell if someone blocked you on Facebook.
Get Reader’s Digest’s Read Up newsletter for more tech tips, humor, cleaning, travel and fun facts all week long.
How to make a Facebook post shareable
If you’re not a natural social media wiz, the process of creating shareable Facebook posts may be as intimidating as retrieving deleted text messages or discovering if someone’s spying on your phone. But take heart: Learning how to make a Facebook post shareable is easier than you probably think. The steps below will show you how to do it.
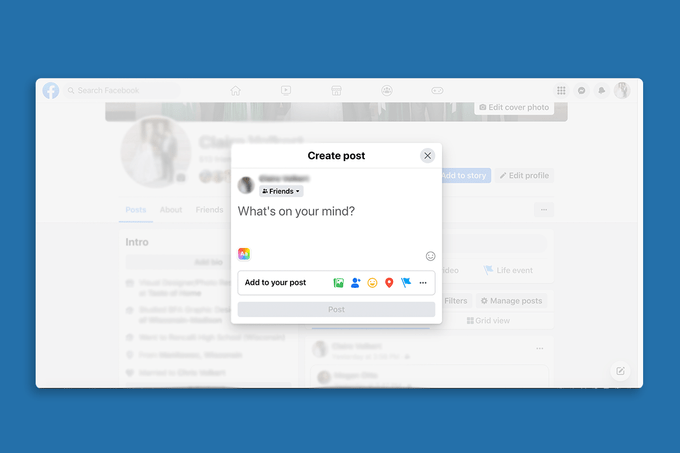
- Navigate to your Facebook feed.
- Create a new post by clicking or tapping on the “What’s on your mind?” bar at the top of the screen.
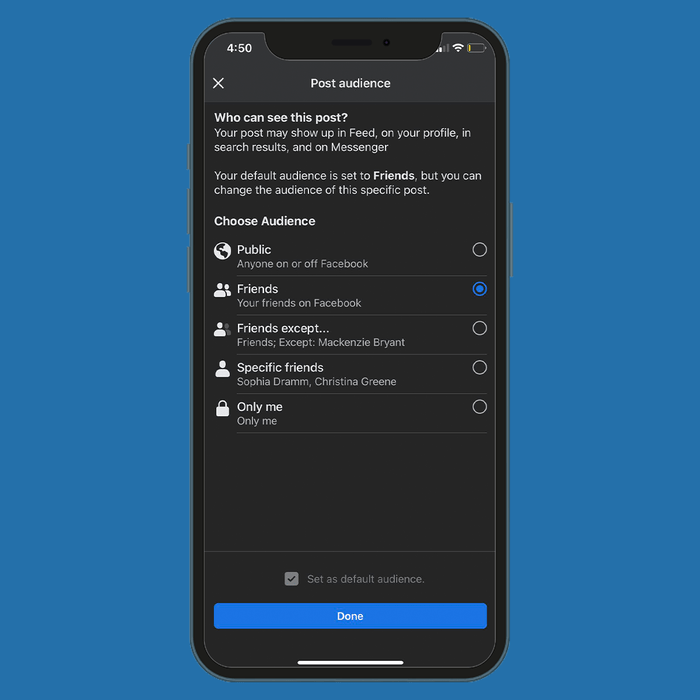
- Enter your post, then click or tap on the small gray box beneath your name. Depending on your default settings, it may say “Public,” “Friends,” “Friends except…,” “Specific friends” or “Only me.”
- In the menu, choose whether you want the public, your friends, specific friends or a custom list of friends to view and share your post. (More on those settings below.)
- Select “Done.”
- To publish your post, select “Post.”
What Facebook’s visibility settings mean
If you’re interested in helpful Facebook hacks, you’ll not only need to know how to make a post shareable on Facebook but also what the various visibility settings mean. They affect who can see your post and share it with others. Here are your options and what they mean:
- Public: If you choose the “Public” option, you will allow anyone with or without a Facebook account to view and share your post.
- Friends: Selecting the “Friends” option limits the post’s viewability and shareability to your Facebook friends list. Keep in mind that if you tag a friend in a post, their Facebook friends will also be able to see it—even if you are not friends with those users. To prevent your post from being visible to the friends of the people you tag, adjust the visibility setting when creating a post: After clicking the gray box beneath your name, select the “Custom” option and uncheck the “Friends of those tagged” item.
- Friends except: By selecting “Friends except…,” you can hide your post from certain friends while still allowing the rest of your Facebook friends to view and share it.
- Specific friends: With the “Specific friends” option, only the people you select can view and share your post.
- Custom: The “Custom” option allows you to selectively share a post with—or hide a post from—specific people. It’s very similar to the “Friends except” and “Specific friends” options, with one exception: There is a shortcut that allows you to create specific friend lists that you can choose to share or not share your posts with every time. This can come in handy when you want to share certain posts with groups or networks you belong to, or when you want to hide sensitive posts from some Facebook friends.
- Only me: This option allows you to share posts on your feed that are visible to you only and will not appear on your friends’ feeds.
FAQs
As you learn how to make a Facebook post shareable, you may come across situations that leave you scratching your head. Luckily, we have answers to your most frequently asked questions. (Speaking of Facebook FAQs, we’ve answered your burning questions about Facebook secret conversations.)
How do I make a Facebook post shareable after posting?
You’ve posted to Facebook, and now you’re hearing rumblings that your friends or other folks can’t share the post. What gives? If people are unable to share your post on Facebook, it’s likely the post’s security settings don’t allow sharing.
So, how do you make a post shareable on Facebook after it’s published to your feed? To make an old post shareable, follow these steps:
On the website
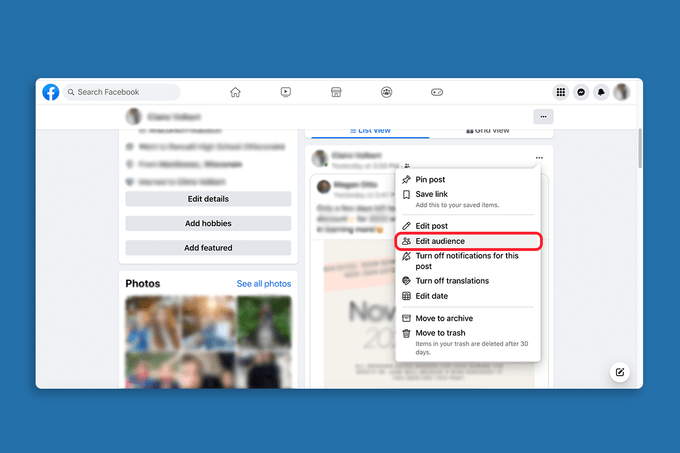
- Find the post you want to make shareable.
- Click on the three-dot icon in the top-right corner.
- Select “Edit audience.”
- Choose whether you want the public, friends, specific friends or a custom list of friends to view and share your post.
- Click “Done.”
On the app
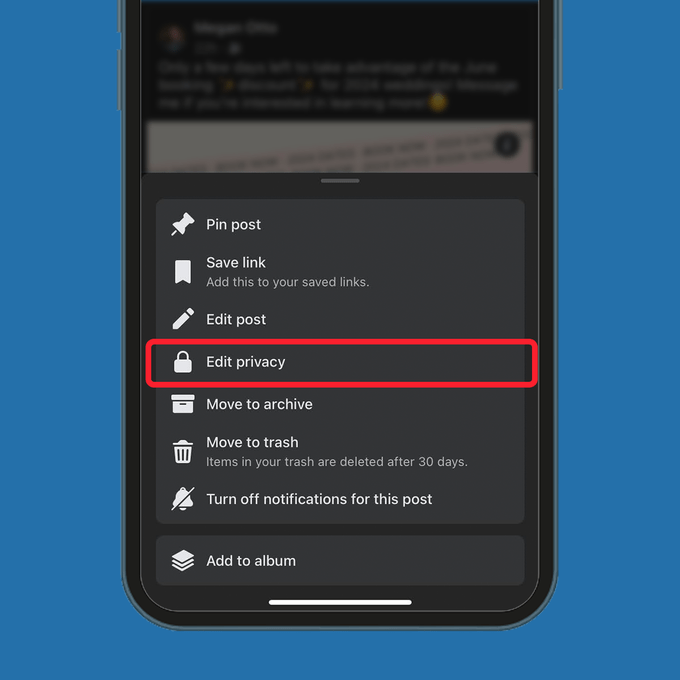
- Find the post you want to make shareable.
- Tap on the three-dot icon in the top-right corner.
- Tap “Edit privacy.”
- Choose whether you want the public, friends, specific friends or a custom list of friends to view and share your post.
- Tap “Done.”
While you’re on the social media site, be sure you’re also aware of common Facebook scams—and how to avoid them.
Can I make certain posts shareable and others not?
Your Facebook profile has a default setting that determines who can view and share your posts. But if you want more specific options, Facebook allows you to customize the privacy settings for individual posts, so you can decide which of your posts should be shareable and which ones will remain private.
Want the post you’re drafting to stay private? You have the “Only me” viewing option at your disposal. Hoping your post will be shared far and wide? You can select “Public” instead. By adjusting the visibility setting before you publish a post, you can determine if and how widely it’s shared.
Why can’t I make my Facebook post shareable?
Struggling to make your Facebook post shareable? This may indicate your default privacy settings on Facebook don’t allow sharing. Hop into your account settings (the same place where you’d change your name) to update them.
Here is how to check and adjust sharing settings:
On the website
- Go to your Facebook home page.
- Click on your profile photo in the top-right corner.
- In the drop-down menu, select “Settings & privacy.”
- Click “Settings.”
- In the left-hand sidebar, select “Privacy.”
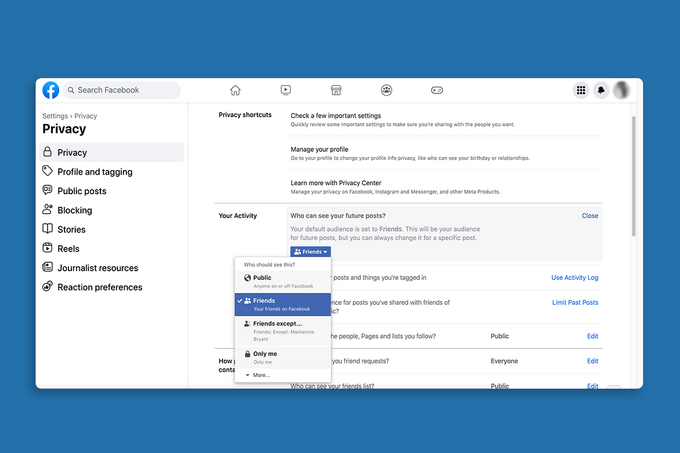
- Under the “Your Activity” section, find the option labeled “Who can see your future posts.”
- Click “Edit” and select the setting you prefer.
On the app
- Open the Facebook app.
- Tap the Menu icon (it’ll show your profile photo) in the bottom-right corner.
- Tap the gear icon in the top-right corner.
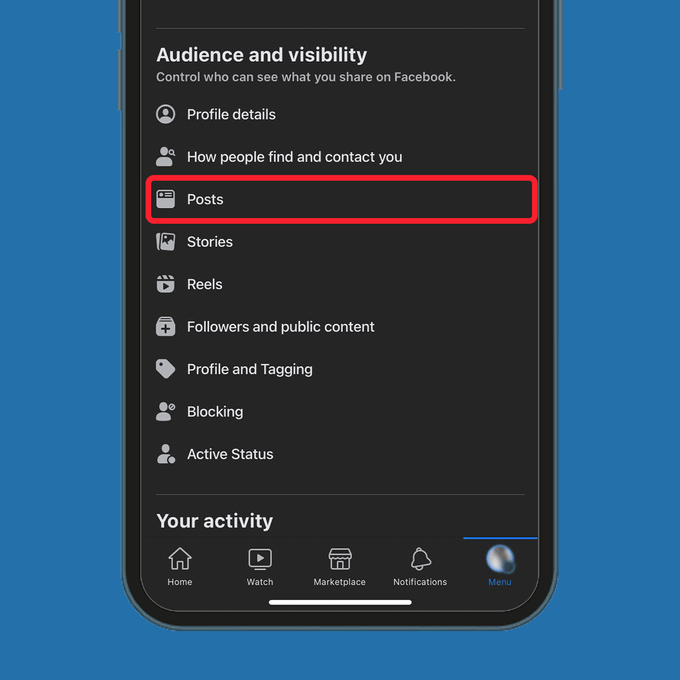
- Scroll down to the “Audience and visibility” section.
- Tap “Posts.”
- Select “Who can see your future posts?”
- Select the setting you prefer.
Why should you make your post shareable on Facebook?
While there is good reason to keep your Facebook posts private, there may be moments when it’s handy to allow sharing on certain posts. For example, you might want to make a shareable post about local events or issues happening in the community, like an upcoming fundraiser or a new restaurant opening. Or maybe you just want to highlight important personal news with a wider audience, whether it’s a new baby or recent retirement.
Whatever the case, Facebook’s customizable settings will allow you to share certain posts while keeping the rest private. And now that you’re well versed in how to make a Facebook post shareable, you can move on to other commonly asked questions about Facebook, like whether you can see who views your Facebook profile.
Sources:
- Facebook Help Center: “Select your audience on Facebook”
- Facebook Help Center: “Change the audience of a post on Facebook”

Originally Published: June 29, 2023